How to Use Tables
With the
JTable
class you can display tables of data, optionally allowing the user to edit
the data. JTable does not contain or cache data; it is simply
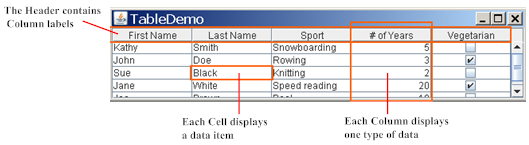
a view of your data. Here is a picture of a typical table displayed within
a scroll pane:
The rest of this section shows you how to accomplish some common table-related tasks. Here are the topics this section covers:
- Creating a Simple Table
- Adding a Table to a Container
- Setting and Changing Column Widths
- User Selections
- Creating a Table Model
- Listening for Data Changes
- Firing Data Change Events
- Concepts: Editors and Renderers
- Using Custom Renderers
- Specifying Tool Tips for Cells
- Specifying Tool Tips for Column Headers
- Sorting and Filtering
- Using a Combo Box as an Editor
- Using Other Editors
- Using an Editor to Validate User-Entered Text
- Printing
- Examples that Use Tables
Creating a Simple Table
Try this:
Click the Launch button to run
SimpleTableDemousing Java™ Web Start (download JDK 6). Or, to compile and run the example yourself, consult the example index.
Click the cell that contains "Snowboarding".
The entire first row is selected, indicating that you have selected Kathy Smith's data. A special highlight indicates that the "Snowboarding" cell is editable. Generally, you begin editing a text cell by double-clicking it.Position the cursor over "First Name". Now press the mouse button and drag to the right.
As you can see, users can rearrange columns in tables.Position the cursor just to the right of a column header. Now press the mouse button and drag to the right or left.
The column changes size, and the other columns adjust to fill the remaining space.- Resize the window containing the table so that it's bigger than necessary
to display the whole table.
All the table cells become wider, expanding to fill the extra horizontal space.
The table in
SimpleTableDemo.java
declares the column names in a String array:
String[] columnNames = {"First Name",
                        "Last Name",
                        "Sport",
                        "# of Years",
                        "Vegetarian"};
Its data is initialized and stored in a two-dimensional Object array:
Object[][] data = {
    {"Kathy", "Smith",
     "Snowboarding", new Integer(5), new Boolean(false)},
    {"John", "Doe",
     "Rowing", new Integer(3), new Boolean(true)},
    {"Sue", "Black",
     "Knitting", new Integer(2), new Boolean(false)},
    {"Jane", "White",
     "Speed reading", new Integer(20), new Boolean(true)},
    {"Joe", "Brown",
     "Pool", new Integer(10), new Boolean(false)}
};
Then the Table is constructed using these data and columnNames:
JTable table = new JTable(data, columnNames);
There are two JTable constructors that directly accept data
(SimpleTableDemo uses the first):
-
JTable(Object[][] rowData, Object[] columnNames) -
JTable(Vector rowData, Vector columnNames)
The advantage of these constructors is that they are easy to use. However, these constructors also have disadvantages:
- They automatically make every cell editable.
- They treat all data types the same (as strings). For example, if a
table column has
Booleandata, the table can display the data in a check box. However, if you use either of the twoJTableconstructors listed previously, yourBooleandata is displayed as a string. You can see this difference in theVegetariancolumn of the previous figure. - They require that you put all of the table's data in an array or vector, which may not be appropriate for some data. For example, if you are instantiating a set of objects from a database, you might want to query the objects directly for their values, rather than copying all their values into an array or vector.
If you want to get around these restrictions, you need to implement your own table model, as described in Creating a Table Model.
Adding a Table to a Container
Here is typical code for creating a scroll pane that serves as a container for a table:
JScrollPane scrollPane = new JScrollPane(table);
table.setFillsViewportHeight(true);
The two lines in this snippet do the following:
- The
JScrollPaneconstructor is invoked with an argument that refers to the table object. This creates a scroll pane as a container for the table; the table is automatically added to the container. JTable.setFillsViewportHeightis invoked to set thefillsViewportHeightproperty. When this property istruethe table uses the entire height of the container, even if the table doesn't have enough rows to use the whole vertical space. This makes it easier to use the table as a drag-and-drop target.
The scroll pane automatically places the table header at the top of the viewport. The column names remain visible at the top of the viewing area when the table data is scrolled.
If you are using a table without a scroll pane, then you must get the table header component and place it yourself. For example:
container.setLayout(new BorderLayout());
container.add(table.getTableHeader(), BorderLayout.PAGE_START);
container.add(table, BorderLayout.CENTER);
Setting and Changing Column Widths
By default, all columns in a table start out with equal width, and the columns automatically fill the entire width of the table. When the table becomes wider or narrower (which might happen when the user resizes the window containing the table), all the column widths change appropriately.
When the user resizes a column by dragging its right border, then either other columns must change size, or the table's size must change. By default, the table's size remains the same, and all columns to the right of the drag point resize to accommodate space added to or removed from the column to the left of the drag point.
To customize initial column widths, you can invoke
setPreferredWidth on each of your table's columns. This sets
both the preferred widths of the columns and their approximate relative
widths. For example, adding the following code to SimpleTableDemo
makes its third column bigger than the other columns:
TableColumn column = null;
for (int i = 0; i < 5; i++) {
    column = table.getColumnModel().getColumn(i);
    if (i == 2) {
        column.setPreferredWidth(100); //third column is bigger
    } else {
        column.setPreferredWidth(50);
    }
}
As the preceding code shows, each column in a table is represented by a
TableColumn
object. TableColumn supplies getter and setter methods for the
minimum, preferred, and maximum widths of a column, as well as a method for
getting the current width. For an example of setting cell widths based on an
approximation of the space needed to draw the cells' contents, see the
initColumnSizes method in
TableRenderDemo.java.
When the user explicitly resizes columns, the columns' preferred widths are set such that the user-specified sizes become the columns' new current widths. However, when table itself is resized — typically because the window has resized —; the columns' preferred widths do not change. Instead, the existing preferred widths are used to calculate new column widths to fill the available space.
You can change a table's resize behavior by invoking
setAutoResizeMode.
User Selections
In its default configuration, a table supports a selection that consists of one or more rows. The user can select a contiguous range of rows or an arbitrary set of rows. The last cell that the user indicated gets a special indication; in the Metal look and feel, the cell is outlined. This cell is known as the lead selection; it is sometimes called "the cell with the focus" or "the current cell".
The user uses the mouse and/or keyboard to make selections, as described in the following table:
| Operation | Mouse Action | Keyboard Action |
|---|---|---|
| Select single row. | Click. | Up Arrow or Down Arrow. |
| Extend contiguous selection. | Shift-Click or Drag over rows. | Shift-Up Arrow or Shift-Down Arrow. |
| Add row to selection/toggle row selection. | Control-Click | Move lead selection with Control-Up Arrow or Control-Down Arrow, then use Space Bar to add to selection or Control-Space Bar to toggle row selection. |
To see how selections work, click the Launch button to run
TableSelectionDemo using
Java™ Web Start
(download
JDK 6). Or, to compile and run the example yourself, consult
the example
index.
This example program presents the familiar table, and allows the user to manipulate certain JTable options. There is also a text pane that logs selection events.
In the screenshot below, a user has run the program, clicked in the first row, then control-clicked in the third row. Notice the outline around the last cell clicked; this is how the Metal look and feel highlights the lead selection.
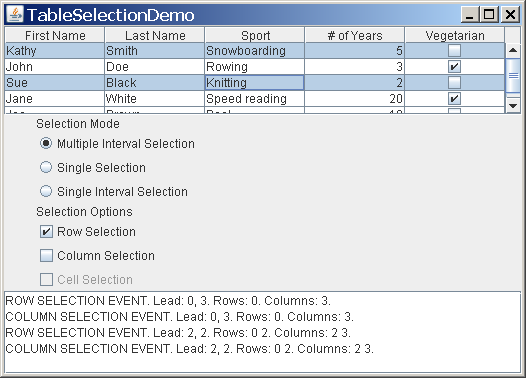
Under "Selection Mode" there are a set of radio buttons. Click the one labelled "Single Selection". Now you can only select one row at a time. If you click on the "Single Interval Selection" radio button, you can select a set of rows that must be contiguous.
All of the radio buttons under "Selection Mode" invoke
JTable.setSelectionMode. This method takes a single argument, which must be one of the following
constants defined in javax.swing.ListSelectionModel:
MULTIPLE_INTERVAL_SELECTION,
SINGLE_INTERVAL_SELECTION, and
SINGLE_SELECTION.
Returning to TableSelectionDemo, notice the three option
checkboxes under "Selection Options." Each of checkbox controls the state
of a boolean bound variable defined by JTable:
- "Row Selection" controls
rowSelectionAllowedwhich has setter methodsetRowSelectionAllowedand getter methodgetRowSelectionAllowed. When this bound property istrue(and thecolumnSelectionAllowedproperty isfalse), the user can select by row. - "Column Selection" controls
columnSelectionAllowedwhich has setter methodsetColumnSelectionAllowedand getter methodgetColumnSelectionAllowed. When this bound property istrue(and therowSelectionAllowedbound property isfalse), the user can select by column. - "Cell Selection" controls
cellSelectionEnabled, which has setter methodsetCellSelectionEnabledand getter methodgetCellSelectionEnabled. When this bound property istrue, the user can select a single cell or rectangular block of cells.
NOTE:
JTable uses a very simple concept of selection, managed as
an intersection of rows and columns. It was not designed to handle fully
independent cell selections.
If you clear all three check boxes (setting all three bound properties
to false), there is no selection; only the lead selection is
shown.
You may notice that the "Cell Selection" checkbox is disabled in multiple interval selection mode. This is because cell selection is not supported in this mode in the demo. You can specify selection by cell in multiple interval selection mode, but the result is a table that does not produce useful selections.
You may also notice that changing any of the three selection options
can affect the others. This is because allowing both row selection and
column selection is exactly the same as enabling cell selection.
JTable automatically updates the three bound variables
as necessary to keep them consistent.
NOTE: Setting
cellSelectionEnabled to a value has the side effect
of also setting both rowSelectionEnabled and
columnSelectionEnabled to that value. Setting both
rowSelectionEnabled and columnSelectionEnabled
to a value has the side effect of also setting
cellSelectionEnabled to that value. Setting
rowSelectionEnabled and columnSelectionEnabled
to different values has the side effect of also setting
cellSelectionEnabled to false.
To retrieve the current selection, use
JTable.getSelectedRows
which returns an array of row indexes, and
JTable.getSelectedColumns
which returns an array of column indexes. To retrieve the coordinates
of the lead selection, refer to the selection models for the table
itself and for the table's column model. The following code formats a
string containing the row and column of the lead selection:
String.format("Lead Selection: %d, %d. ",
    table.getSelectionModel().getLeadSelectionIndex(),
    table.getColumnModel().getSelectionModel().getLeadSelectionIndex());
User selections generate a number of events. For information on these, refer to How to Write a List Selection Listener in the Writing Event Listeners lesson.
NOTE: Selection data actually describes selected cells in the "view" (table data as it appears after any sorting or filtering) rather than in the table model. This distinction does not matter unless your viewed data has been rearranged by sorting, filtering, or user manipulation of columns. In that case, you must convert selection coordinates using the conversion methods described in Sorting and Filtering.
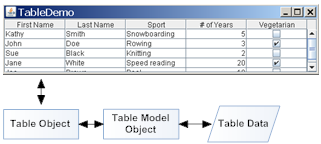
Creating a Table Model
Every table object uses a table model object to manage the
actual table data. A table model object must implement the
TableModel
interface. If the programmer does not provide a table model object,
JTable automatically creates an instance of
DefaultTableModel. This relationship is illustrated below.
The JTable constructor used by
SimpleTableDemo creates its table model with code like
this:
new AbstractTableModel() {
    public String getColumnName(int col) {
        return columnNames[col].toString();
    }
    public int getRowCount() { return rowData.length; }
    public int getColumnCount() { return columnNames.length; }
    public Object getValueAt(int row, int col) {
        return rowData[row][col];
    }
    public boolean isCellEditable(int row, int col)
        { return true; }
    public void setValueAt(Object value, int row, int col) {
        rowData[row][col] = value;
        fireTableCellUpdated(row, col);
    }
}
As the preceding code shows, implementing a table model can be
simple. Generally, you implement your table model in a subclass
of the
AbstractTableModel
class.
Your model might hold its data in an array, vector, or hash map, or it might get the data from an outside source such as a database. It might even generate the data at execution time.
This table is different from the SimpleTableDemo
table in the following ways:
TableDemo's custom table model, even though it is simple, can easily determine the data's type, helping theJTabledisplay the data in the best format.SimpleTableDemo's automatically created table model, on the other hand, does not know that the # of Years column contains numbers (which should generally be right aligned and have a particular format). It also does not know that theVegetariancolumn contains boolean values, which can be represented by check boxes.- The custom table model implemented in
TableDemodoes not let you edit the name columns; it does, however, let you edit the other columns. InSimpleTableDemo, all cells are editable.
See below the code taken from
TableDemo.java
that is different from the
SimpleTableDemo.java. Bold font indicates the code that makes this table's model different from the table model defined automatically for SimpleTableDemo.
public TableDemo() {
    ...
    JTable table = new JTable(new MyTableModel());
    ...
}

class MyTableModel extends AbstractTableModel {
    private String[] columnNames = ...//same as before...
    private Object[][] data = ...//same as before...

    public int getColumnCount() {
        return columnNames.length;
    }

    public int getRowCount() {
        return data.length;
    }

    public String getColumnName(int col) {
        return columnNames[col];
    }

    public Object getValueAt(int row, int col) {
        return data[row][col];
    }

    public Class getColumnClass(int c) {
        return getValueAt(0, c).getClass();
    }

    /*
     * Don't need to implement this method unless your table's
     * editable.
     */
    public boolean isCellEditable(int row, int col) {
        //Note that the data/cell address is constant,
        //no matter where the cell appears onscreen.
        if (col < 2) {
            return false;
        } else {
            return true;
        }
    }

    /*
     * Don't need to implement this method unless your table's
     * data can change.
     */
    public void setValueAt(Object value, int row, int col) {
        data[row][col] = value;
        fireTableCellUpdated(row, col);
    }
    ...
}
Listening for Data Changes
A table model can have a set of listeners that are notified
whenever the table data changes. Listeners are instances of
TableModelListener. In the following example code, SimpleTableDemo is
extended to include such a listener. New code is in bold.
import javax.swing.event.*;
import javax.swing.table.TableModel;

public class SimpleTableDemo ... implements TableModelListener {
    ...
    public SimpleTableDemo() {
        ...
        table.getModel().addTableModelListener(this);
        ...
    }

    public void tableChanged(TableModelEvent e) {
        int row = e.getFirstRow();
        int column = e.getColumn();
        TableModel model = (TableModel)e.getSource();
        String columnName = model.getColumnName(column);
        Object data = model.getValueAt(row, column);

        ...// Do something with the data...
    }
    ...
}
Firing Data Change Events
In order to fire data change events the table model must know how to
construct a
TableModelEvent
object. This can be a complex procedure, but is already implemented
in DefaultTableModel. You can either allow JTable
to use its default instance of DefaultTableModel, or
create your own custom subclass of DefaultTableModel.
If DefaultTableModel is not a suitable base class for
your custom table model class, consider subclassing
AbstractTableModel. This class implements a simple framework for constructing
TableModelEvent objects. Your custom class simply needs
to invoke one the following AbstractTableModel methods
each time table data is changed by an external source.
| Method | Change |
|---|---|
fireTableCellUpdated |
Update of specified cell. |
fireTableRowsUpdated |
Update of specified rows |
fireTableDataChanged |
Update of entire table (data only). |
fireTableRowsInserted |
New rows inserted. |
fireTableRowsDeleted |
Existing rows Deleted |
fireTableStructureChanged |
Invalidate entire table, both data and structure. |
Concepts: Editors and Renderers
Before you go on to the next few tasks, you need to understand how tables draw their cells. You might expect each cell in a table to be a component. However, for performance reasons, Swing tables are implemented differently.
Instead, a single cell renderer is generally used to draw all of the cells that contain the same type of data. You can think of the renderer as a configurable ink stamp that the table uses to stamp appropriately formatted data onto each cell. When the user starts to edit a cell's data, a cell editor takes over the cell, controlling the cell's editing behavior.
For example, each cell in the # of Years column in
TableDemo contains Number data —
specifically, an Integer object. By default, the cell
renderer for a Number-containing column uses a single
JLabel instance to draw the appropriate numbers,
right-aligned, on the column's cells. If the user begins editing
one of the cells, the default cell editor uses a right-aligned
JTextField to control the cell editing.
To choose the renderer that displays the cells in a column, a
table first determines whether you specified a renderer for that
particular column. If you did not, then the table invokes the table
model's getColumnClass method, which gets the data type
of the column's cells. Next, the table compares the column's data
type with a list of data types for which cell renderers are
registered. This list is initialized by the table, but you can add
to it or change it. Currently, tables put the following types of
data in the list:
Boolean— rendered with a check box.Number— rendered by a right-aligned label.Double,Float— same asNumber, but the object-to-text translation is performed by aNumberFormatinstance (using the default number format for the current locale).Date— rendered by a label, with the object-to-text translation performed by aDateFormatinstance (using a short style for the date and time).ImageIcon,Icon— rendered by a centered label.Object— rendered by a label that displays the object's string value.
Cell editors are chosen using a similar algorithm.
Remember that if you let a table create its own model, it uses
Object as the type of every column. To specify more
precise column types, the table model must define the
getColumnClass method appropriately, as demonstrated by
TableDemo.java.
Keep in mind that although renderers determine how each cell or column header looks and can specify its tool tip text, a renderer does not handle events. If you need to pick up the events that take place inside a table, the technique you use varies by the sort of event you are interested in:
| Situation | How to Get Events |
|---|---|
| To detect events from a cell that is being edited... | Use the cell editor (or register a listener on the cell editor). |
| To detect row/column/cell selections and deselections... | Use a selection listener as described in Detecting User Selections. |
| To detect mouse events on a column header... | Register the appropriate type of
mouse listener
on the table's JTableHeader object. (See
TableSorter.java
for an example.) |
| To detect other events... | Register the appropriate listener on the JTable object. |
The next few sections tell you how to customize display and editing by specifying renderers and editors. You can specify cell renderers and editors either by column or by data type.
Using Custom Renderers
This section tells you how to create and specify a cell renderer. You
can set a type-specific cell renderer using the JTable
method setDefaultRenderer. To specify that cells in a
particular column should use a renderer, you use the
TableColumn method setCellRenderer. You can
even specify a cell-specific renderer by creating a JTable
subclass.
It is easy to customize the text or image rendered by the default
renderer, DefaultTableCellRenderer. You just create a
subclass and implement the setValue method so that it
invokes setText or setIcon with the
appropriate string or image. For example, here is how the default
date renderer is implemented:
static class DateRenderer extends DefaultTableCellRenderer {
    DateFormat formatter;
    public DateRenderer() { super(); }

    public void setValue(Object value) {
        if (formatter==null) {
            formatter = DateFormat.getDateInstance();
        }
        setText((value == null) ? "" : formatter.format(value));
    }
}
If extending DefaultTableCellRenderer is insufficient,
you can build a renderer using another superclass. The easiest way is
to create a subclass of an existing component, making your subclass
implement the
TableCellRenderer
interface. TableCellRenderer requires just one method:
getTableCellRendererComponent. Your implementation of this
method should set up the rendering component to reflect the passed-in
state, and then return the component.
In the snapshot of
TableDialogEditDemo, the renderer used for Favorite
Color cells is a subclass of JLabel called
ColorRenderer. Here are excerpts from
ColorRenderer.java
that show how it is implemented.
public class ColorRenderer extends JLabel
                           implements TableCellRenderer {
    ...
    public ColorRenderer(boolean isBordered) {
        this.isBordered = isBordered;
        setOpaque(true); //MUST do this for background to show up.
    }

    public Component getTableCellRendererComponent(
                            JTable table, Object color,
                            boolean isSelected, boolean hasFocus,
                            int row, int column) {
        Color newColor = (Color)color;
        setBackground(newColor);
        if (isBordered) {
            if (isSelected) {
                ...
                //selectedBorder is a solid border in the color
                //table.getSelectionBackground().
                setBorder(selectedBorder);
            } else {
                ...
                //unselectedBorder is a solid border in the color
                //table.getBackground().
                setBorder(unselectedBorder);
            }
        }

        setToolTipText(...); //Discussed in the following section
        return this;
    }
}
Here is the code from
TableDialogEditDemo.java
that registers a ColorRenderer instance as the default
renderer for all Color data:
table.setDefaultRenderer(Color.class, new ColorRenderer(true));
To specify a cell-specific renderer, you need to define a
JTable subclass that overrides the getCellRenderer
method. For example, the following code makes the first cell in the first
column of the table use a custom renderer:
TableCellRenderer weirdRenderer = new WeirdRenderer();
table = new JTable(...) {
    public TableCellRenderer getCellRenderer(int row, int column) {
        if ((row == 0) && (column == 0)) {
            return weirdRenderer;
        }
        // else...
        return super.getCellRenderer(row, column);
    }
};
Specifying Tool Tips for Cells
By default, the tool tip text displayed for a table cell is determined
by the cell's renderer. However, sometimes it can be simpler to specify tool
tip text by overriding JTable's implementation of the
getToolTipText(MouseEvent) method. This section shows you how
to use both techniques.
To add a tool tip to a cell using its renderer, you first need to get
or create the cell renderer. Then, after making sure the rendering
component is a JComponent, invoke the setToolTipText
method on it.
An example of setting tool tips for cells is in TableRenderDemo.
Click the Launch button to run it using
Java™ Web Start
(download
JDK 6). Or, to compile and run the example yourself, consult
the example
index.
The source code is in
TableRenderDemo.java. It adds tool tips to the cells of the Sport column with the
following code:
//Set up tool tips for the sport cells.
DefaultTableCellRenderer renderer =
        new DefaultTableCellRenderer();
renderer.setToolTipText("Click for combo box");
sportColumn.setCellRenderer(renderer);
Although the tool tip text in the previous example is static, you can also implement tool tips whose text changes depending on the state of the cell or program. Here are a couple ways to do so:
- Add a bit of code to the renderer's implementation of the
getTableCellRendererComponentmethod. - Override the
JTablemethodgetToolTipText(MouseEvent).
An example of adding code to a cell renderer is in TableDialogEditDemo.
Click the Launch button to run it using
Java™ Web Start
(download
JDK 6). Or, to compile and run the example yourself, consult
the example
index.
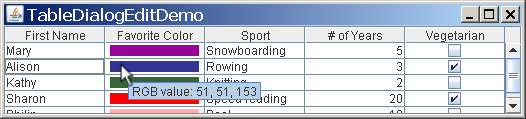
TableDialogEditDemo uses a renderer for colors, implemented in
ColorRenderer.java, that sets the tool tip text using the boldface code in the
following snippet:
public class ColorRenderer extends JLabel
                           implements TableCellRenderer {
    ...
    public Component getTableCellRendererComponent(
                            JTable table, Object color,
                            boolean isSelected, boolean hasFocus,
                            int row, int column) {
        Color newColor = (Color)color;
        ...
        setToolTipText("RGB value: " + newColor.getRed() + ", "
                                     + newColor.getGreen() + ", "
                                     + newColor.getBlue());
        return this;
    }
}
Here is an example of what the tool tip looks like:
You can specify tool tip text by overriding JTable's
getToolTipText(MouseEvent) method. The program
TableToolTipsDemo shows how. Click the Launch button to run
it using
Java™ Web Start
(download
JDK 6). Or, to compile and run the example yourself, consult
the example
index.
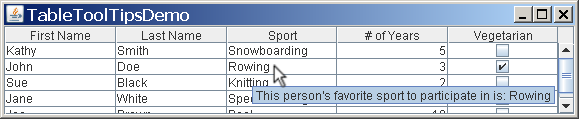
The cells with tool tips are in the Sport and Vegetarian columns. Here is a picture of its tool tip:
Here is the code from
TableToolTipsDemo.java
that implements tool tips for cells in the Sport and
Vegetarian columns:
JTable table = new JTable(new MyTableModel()) {
    //Implement table cell tool tips.
    public String getToolTipText(MouseEvent e) {
        String tip = null;
        java.awt.Point p = e.getPoint();
        int rowIndex = rowAtPoint(p);
        int colIndex = columnAtPoint(p);
        int realColumnIndex = convertColumnIndexToModel(colIndex);

        if (realColumnIndex == 2) { //Sport column
            tip = "This person's favorite sport to "
                   + "participate in is: "
                   + getValueAt(rowIndex, colIndex);

        } else if (realColumnIndex == 4) { //Veggie column
            TableModel model = getModel();
            String firstName = (String)model.getValueAt(rowIndex,0);
            String lastName = (String)model.getValueAt(rowIndex,1);
            Boolean veggie = (Boolean)model.getValueAt(rowIndex,4);
            if (Boolean.TRUE.equals(veggie)) {
                tip = firstName + " " + lastName
                      + " is a vegetarian";
            } else {
                tip = firstName + " " + lastName
                      + " is not a vegetarian";
            }

        } else { //another column
            //You can omit this part if you know you don't
            //have any renderers that supply their own tool
            //tips.
            tip = super.getToolTipText(e);
        }
        return tip;
    }
    ...
}
The code is fairly straightforward, except perhaps for the call to
convertColumnIndexToModel. That call is necessary because
if the user moves the columns around, the view's index for the column
will not match the model's index for the column. For example, the user
might drag the Vegetarian column (which the model considers to
be at index 4) so it is displayed as the first column — at view
index 0. Since prepareRenderer provides the view index,
you need to translate the view index to a model index so you can be
sure the intended column has been selected.
Specifying Tool Tips for Column Headers
You can add a tool tip to a column header by setting the tool tip
text for the table's JTableHeader. Often, different column
headers require different tool tip text. You can change the text by
overriding the table header's getToolTipText method.
Alternately, you can invoke TableColumn.setHeaderRenderer
to provide a custom renderer for the header.
An example of using the same tool tip text for all column headers is in
TableToolTipsDemo.java
has an example of implementing column header tool tips that vary by column. If
you run TableToolTipsDemo (click the Launch button) using
Java™ Web Start
(download
JDK 6). Or, to compile and run the example yourself, consult
the example
index.
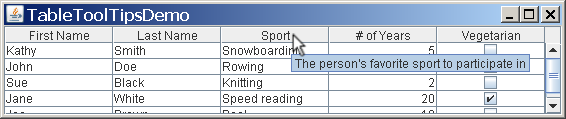
You will see the tool tips when you mouse over any column header except for the first two. No tool tips were suppled for the name columns since they seemed self-explanatory. Here is a picture of one of the column header tool tips:
The following code implements the tool tips. Basically, it creates a
subclass of JTableHeader that overrides the
getToolTipText(MouseEvent) method so that it returns the
text for the current column. To associate the revised table header with
the table, the JTable method
createDefaultTableHeader is overridden so that it returns
an instance of the JTableHeader subclass.
protected String[] columnToolTips = {
    null, // "First Name" assumed obvious
    null, // "Last Name" assumed obvious
    "The person's favorite sport to participate in",
    "The number of years the person has played the sport",
    "If checked, the person eats no meat"};
...

JTable table = new JTable(new MyTableModel()) {
    ...

    //Implement table header tool tips.
    protected JTableHeader createDefaultTableHeader() {
        return new JTableHeader(columnModel) {
            public String getToolTipText(MouseEvent e) {
                String tip = null;
                java.awt.Point p = e.getPoint();
                int index = columnModel.getColumnIndexAtX(p.x);
                int realIndex =
                        columnModel.getColumn(index).getModelIndex();
                return columnToolTips[realIndex];
            }
        };
    }
};
Sorting and Filtering
Table sorting and filtering is managed by a sorter object.
The easiest way to provide a sorter object is to set
autoCreateRowSorter bound property to
true:
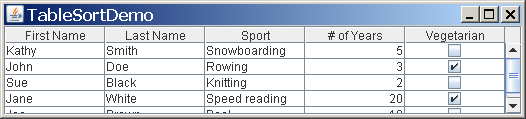
JTable table = new JTable();
table.setAutoCreateRowSorter(true);
This action defines a row sorter that is an instance of
javax.swing.table.TableRowSorter. This provides a table that does a simple locale-specific sort when
the user clicks on a column header. This is demonstrated in
TableSortDemo.java
To have more control over sorting, you can construct an
instance of TableRowSorter and specify that it is
the sorter object for your table.
TableRowSorter<TableModel> sorter
    = new TableRowSorter<TableModel>(table.getModel());
table.setRowSorter(sorter);
TableRowSorter uses
java.util.Comparator
objects to sort its rows. A class that implements this
interface must provide a method called compare that
defines how any two objects are compared for the purpose of
sorting. For example, the following code creates a
Comparator that sorts a set of strings by the
last word in each string:
Comparator<String> comparator = new Comparator<String>() {
    public int compare(String s1, String s2) {
        String[] strings1 = s1.split("\\s");
        String[] strings2 = s2.split("\\s");
        return strings1[strings1.length - 1]
            .compareTo(strings2[strings2.length - 1]);
    }
};
This example is fairly simplistic; more typically, a
Comparator implementation is a subclass of
java.text.Collator. You can define your own subclass, use the factory methods in
Collator to obtain a Comparator for
a specific locale, or use
java.text.RuleBasedCollator.
To determine which Comparator to use for a column,
TableRowSorter attempts to apply each of the following
rules in turn. Rules are followed in the order listed below; the
first rule that provides the sorter with a Comparator
is used, and the remainining rules ignored.
- If a comparator has been specified by invoking
setComparator, use that comparator. - If the table model reports that the column data consists of
strings (
TableModel.getColumnClassreturnsString.classfor that column), use a comparator that sorts the strings based on the current locale. - If the column class returned by
TableModel.getColumnClassimplementsComparable, use a comparator that sorts the strings based on the values returned byComparable.compareTo. - If a string convertor has been specified for the table by invoking
setStringConverter, use a comparator that sorts the resulting string representations based on the current locale. - If none of the previous rules apply, use a comparator that invokes
toStringon the column data and sorts the resulting strings based on the current locale.
For more sophisticated kinds of sorting, subclass
TableRowSorter or its parent class
javax.swing.DefaultRowSorter.
To specify the sort order and sort precedence for columns, invoke
setSortKeys. Here is an example that sorts the table used in the examples by the
first two columns. The precedence of the columns in the sort is
indicated by the order of the sort keys in the sort key list. In this
case, the second column has the first sort key, so they rows are
sorted by first name, then last name.
List <RowSorter.SortKey> sortKeys
    = new ArrayList<RowSorter.SortKey>();
sortKeys.add(new RowSorter.SortKey(1, SortOrder.ASCENDING));
sortKeys.add(new RowSorter.SortKey(0, SortOrder.ASCENDING));
sorter.setSortKeys(sortKeys);
In addition to reordering the results, a table sorter can also
specify which rows will be displayed. This is known as filtering.
TableRowSorter implements filtering using
javax.swing.RowFilter
objects. RowFilter implements several factory methods
that create common kinds of filters. For example,
regexFilter
returns a RowFilter that filters based on a
regular expression.
In the following example code, you explicitly create a sorter object so you can later use it to specify a filter:
MyTableModel model = new MyTableModel();
sorter = new TableRowSorter<MyTableModel>(model);
table = new JTable(model);
table.setRowSorter(sorter);
Then you filter based on the current value of a text field:
private void newFilter() {
    RowFilter<MyTableModel, Object> rf = null;
    //If current expression doesn't parse, don't update.
    try {
        rf = RowFilter.regexFilter(filterText.getText(), 0);
    } catch (java.util.regex.PatternSyntaxException e) {
        return;
    }
    sorter.setRowFilter(rf);
}
In a subsequent example, newFilter() is
invoked every time the text field changes. When the user enters
complicated regular expressions, the try...catch
prevents the syntax exception from interfering with input.
When a table uses a sorter, the data the users sees may be
in a different order than that specified by the data model,
and may not include all rows specified by the data model. The
data the user actually sees is known as the view, and
has its own set of coordinates. JTable provides
methods that convert from model coordinates to view coordinates
—
convertColumnIndexToView
and
convertRowIndexToView
— and that convert from view coordinates to model
coordinates —
convertColumnIndexToModel
and
convertRowIndexToModel.
NOTE: When using a sorter, always remember to translate cell coordinates.
The following example brings together the ideas discussed in this section.
TableFilterDemo.javaTableDemo. These
include the code snippets earlier in this section, which
provide a sorter for the main table, and use a text field to
supply the filtering regular expression. The following screen
shot shows TableFilterDemo before any sorting or
filtering has been done. Notice that row 3 in the model is
still the same as row 3 in the view:

If the user clicks twice on the second column, the fourth row becomes the first row — but only in the view:
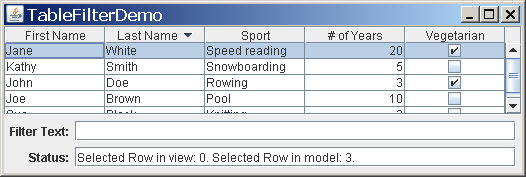
As previously noted, the text the user enters in the "Filter Text" text field defines a filter that determines which rows are shown. As with sorting, filtering can cause view coordinates to diverge from model coordinates:
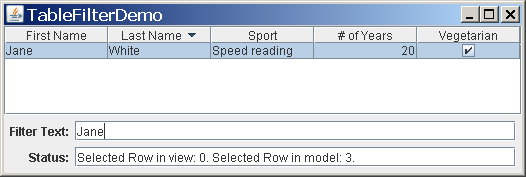
Here is the code that updates the status field to reflect the current selection:
table.getSelectionModel().addListSelectionListener(
        new ListSelectionListener() {
            public void valueChanged(ListSelectionEvent event) {
                int viewRow = table.getSelectedRow();
                if (viewRow < 0) {
                    //Selection got filtered away.
                    statusText.setText("");
                } else {
                    int modelRow =
                        table.convertRowIndexToModel(viewRow);
                    statusText.setText(
                        String.format("Selected Row in view: %d. " +
                            "Selected Row in model: %d.",
                            viewRow, modelRow));
                }
            }
        }
);
Using a Combo Box as an Editor
Setting up a combo box as an editor is simple, as the following example shows. The bold line of code sets up the combo box as the editor for a specific column.
TableColumn sportColumn = table.getColumnModel().getColumn(2);
...
JComboBox comboBox = new JComboBox();
comboBox.addItem("Snowboarding");
comboBox.addItem("Rowing");
comboBox.addItem("Chasing toddlers");
comboBox.addItem("Speed reading");
comboBox.addItem("Teaching high school");
comboBox.addItem("None");
sportColumn.setCellEditor(new DefaultCellEditor(comboBox));
Here is a picture of the combo box editor in use:

The preceding code is from
TableRenderDemo.java. You can run TableRenderDemo (click the Launch button) using
Java™ Web Start
(download
JDK 6). Or, to compile and run the example yourself, consult
the example
index.
Using Other Editors
Whether you are setting the editor for a single column of cells (using
the TableColumn setCellEditor method) or for
a specific type of data (using the JTable
setDefaultEditor method), you specify the editor using an
argument that adheres to the TableCellEditor interface.
Fortunately, the DefaultCellEditor class implements this
interface and provides constructors to let you specify an editing
component that is a JTextField, JCheckBox, or
JComboBox. Usually you do not have to explicitly specify a
check box as an editor, since columns with Boolean data
automatically use a check box renderer and editor.
What if you want to specify an editor other than a text field, check
box, or combo box? As DefaultCellEditor does not support
other types of components, you must do a little more work. You need to
create a class that implements the
TableCellEditor
interface. The
AbstractCellEditor
class is a good superclass to use. It implements
TableCellEditor's superinterface,
CellEditor, saving you the trouble of implementing the event firing code necessary
for cell editors.
Your cell editor class needs to define at least two methods —
getCellEditorValue and getTableCellEditorComponent.
The getCellEditorValue method, required by
CellEditor, returns the cell's current value. The
getTableCellEditorComponent method, required by
TableCellEditor, should configure and return the component
that you want to use as the editor.
Here is a picture of a table with a dialog that serves, indirectly, as a cell editor. When the user begins editing a cell in the Favorite Color column, a button (the true cell editor) appears and brings up the dialog, with which the user can choose a different color.
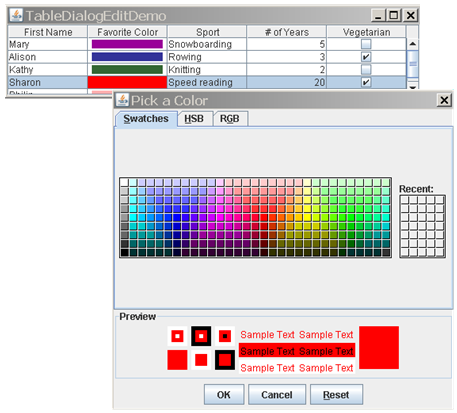
You can run TableDialogEditDemo (click the Launch button) using
Java™ Web Start
(download
JDK 6). Or, to compile and run the example yourself, consult
the example
index.
Here is the code, taken from
ColorEditor.java, that implements the cell editor.
public class ColorEditor extends AbstractCellEditor
                         implements TableCellEditor,
                                    ActionListener {
    Color currentColor;
    JButton button;
    JColorChooser colorChooser;
    JDialog dialog;
    protected static final String EDIT = "edit";

    public ColorEditor() {
        button = new JButton();
        button.setActionCommand(EDIT);
        button.addActionListener(this);
        button.setBorderPainted(false);

        //Set up the dialog that the button brings up.
        colorChooser = new JColorChooser();
        dialog = JColorChooser.createDialog(button,
                                        "Pick a Color",
                                        true,  //modal
                                        colorChooser,
                                        this,  //OK button handler
                                        null); //no CANCEL button handler
    }

    public void actionPerformed(ActionEvent e) {
        if (EDIT.equals(e.getActionCommand())) {
            //The user has clicked the cell, so
            //bring up the dialog.
            button.setBackground(currentColor);
            colorChooser.setColor(currentColor);
            dialog.setVisible(true);

            fireEditingStopped(); //Make the renderer reappear.

        } else { //User pressed dialog's "OK" button.
            currentColor = colorChooser.getColor();
        }
    }

    //Implement the one CellEditor method that AbstractCellEditor doesn't.
    public Object getCellEditorValue() {
        return currentColor;
    }

    //Implement the one method defined by TableCellEditor.
    public Component getTableCellEditorComponent(JTable table,
                                                 Object value,
                                                 boolean isSelected,
                                                 int row,
                                                 int column) {
        currentColor = (Color)value;
        return button;
    }
}
As you can see, the code is pretty simple. The only part that is a
bit tricky is the call to fireEditingStopped at the end of
the editor button's action handler. Without this call, the editor would
remain active, even though the modal dialog is no longer visible. The
call to fireEditingStopped lets the table know that it
can deactivate the editor, letting the cell be handled by the renderer
again.
Using an Editor to Validate User-Entered Text
If a cell's default editor allows text entry, you get some error
checking for free if the cell's type is specified as something other
than String or Object. The error checking
is a side effect of converting the entered text into an object of
the proper type.
The automatic checking of user-entered strings occurs when the
default editor attempts to create a new instance of the class
associated with the cell's column. The default editor creates this
instance using a constructor that takes a String as an
argument. For example, in a column whose cells have type
Integer, when the user types in "123" the default editor
creates the corresponding Integer using code equivalent
to new Integer("123"). If the constructor throws an
exception, the cell's outline turns red and refuses to let focus move
out of the cell. If you implement a class used as a column data type,
you can use the default editor if your class supplies a constructor
that takes a single argument of type String.
If you like having a text field as the editor for a cell, but want to customize it — perhaps to check user-entered text more strictly or to react differently when the text is invalid — you can change the cell editor to use a formatted text field. The formatted text field can check the value either continuously while the user is typing or after the user has indicated the end of typing (such as by pressing Enter).
The following code, taken from a demo named
TableFTFEditDemo.java, sets up a formatted text field as an editor that limits all integer
values to be between 0 and 100. You can run TableFTFEditDemo
(click the Launch button) using
Java™ Web Start
(download
JDK 6). Or, to compile and run the example yourself, consult
the example
index.
The following code makes the formatted text field the editor for all
columns that contain data of type Integer.
table.setDefaultEditor(Integer.class,
                       new IntegerEditor(0, 100));
The IntegerEditor class is implemented as a subclass of
DefaultCellEditor
that uses a JFormattedTextField instead of the
JTextField that DefaultCellEditor supports.
It accomplishes this by first setting up a formatted text field to use
an integer format and have the specified minimum and maximum values,
using the API described in How to
Use Formatted Text Fields. It then overrides the
DefaultCellEditor implementation of the
getTableCellEditorComponent,
getCellEditorValue, and stopCellEditing
methods, adding the operations that are necessary for formatted
text fields.
The override of getTableCellEditorComponent sets the
formatted text field's value property (and not just the
text property it inherits from JTextField) before
the editor is shown. The override of getCellEditorValue
keeps the cell value as an Integer, rather than, say, the
Long value that the formatted text field's parser tends
to return. Finally, overriding stopCellEditing lets you
check whether the text is valid, possibly stopping the editor from
being dismissed. If the text isn't valid, your implementation of
stopCellEditing puts up a dialog that gives the user
the option of continuing to edit or reverting to the last good value.
The source code is a bit too long to include here, but you can
find it in
IntegerEditor.java.
Printing
JTable provides a simple API for printing tables. The
easiest way to print out a table is to invoke
JTable.print
with no arguments:
try {
    if (! table.print()) {
        System.err.println("User cancelled printing");
    }
} catch (java.awt.print.PrinterException e) {
    System.err.format("Cannot print %s%n", e.getMessage());
}
Invoking print on a normal Swing application brings
up a standard printing dialog box. (On a headless application, the
table is simply printed.) The return value indicates whether the
user went ahead with the print job or cancelled it.
JTable.print can throw
java.awt.print.PrinterException, which is a
checked exception; that's why the above example uses a try ... catch.
JTable provides several overloads of
print with various options. The following code from
TablePrintDemo.java
MessageFormat header = new MessageFormat("Page {0,number,integer}");
try {
    table.print(JTable.PrintMode.FIT_WIDTH, header, null);
} catch (java.awt.print.PrinterException e) {
    System.err.format("Cannot print %s%n", e.getMessage());
}
For more sophisticated printing applications, use
JTable.getPrintable
to obtain a Printable object for the table. For more
on Printable, refer to the
Printing
lesson in the
2D Graphics
trail.
Examples that Use Tables
This table lists examples that use JTable and where
those examples are described.
| Example | Where Described | Notes |
|---|---|---|
SimpleTableDemo |
Creating a Simple Table | A basic table with no custom model. Does not include code to specify column widths or detect user editing. |
SimpleTable- |
Detecting User Selections | Adds single selection and selection detection to
SimpleTableDemo. By modifying the program's
ALLOW_COLUMN_SELECTION and ALLOW_ROW_SELECTION
constants, you can experiment with alternatives to the table default
of allowing only rows to be selected. |
TableDemo |
Creating a Table Model | A basic table with a custom model. |
TableFTFEditDemo |
Using an Editor to Validate User-Entered Text | Modifies TableDemo to use a custom editor (a
formatted text field variant) for all Integer
data. |
TableRenderDemo |
Using a Combo Box as an Editor | Modifies TableDemo to use a custom editor (a
combo box) for all data in the Sport column. Also
intelligently picks column sizes. Uses renderers to display tool
tips for the sport cells. |
TableDialogEditDemo |
Using Other Editors | Modifies TableDemo to have a cell renderer and
editor that display a color and let you choose a new one, using
a color chooser dialog. |
TableToolTipsDemo |
Specifying Tool Tips for Cells, Specifying Tool Tips for Column Headers, | Demonstrates how to use several techniques to set tool tip text for cells and column headers. |
TableSortDemo |
Sorting and Filtering | Demonstrates the default sorter, which allows the user to sort columns by clicking on their headers. |
TableFilterDemo |
Sorting and Filtering | Demonstrates sorting and filtering, and how this can cause the view coordinates to diverge from the model coordinates. |
TablePrintDemo |
Printing | Demonstrates table printing. |
ListSelectionDemo |
How to Write a List Selection Listener | Shows how to use all list selection modes, using a list selection listener that's shared between a table and list. |
SharedModelDemo |
Nowhere | Builds on ListSelectionDemo making the data
model be shared between the table and list. If you edit an
item in the first column of the table, the new value is
reflected in the list. |
| TreeTable, TreeTable II | Creating TreeTables in Swing, Creating TreeTables: Part 2 | Examples that combine a tree and table to show detailed information about a hierarchy such as a file system. The tree is a renderer for the table. |
