The
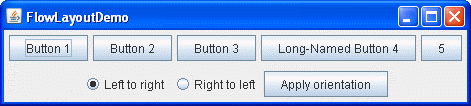
Note: This lesson covers writing layout code by hand, which can be challenging. If you are not interested in learning all the details of layout management, you might prefer to use theGroupLayoutlayout manager combined with a builder tool to lay out your GUI. One such builder tool is the NetBeans IDE. Otherwise, if you want to code by hand and do not want to useGroupLayout, thenGridBagLayoutis recommended as the next most flexible and powerful layout manager.FlowLayoutclass provides a very simple layout manager that is used, by default, by theJPanelobjects. The following figure represents a snapshot of an application that uses the flow layout:
Click the Launch button to run FlowLayoutDemo using Java™ Web Start (download JDK 6). Alternatively, to compile and run the example yourself, consult the example index.
The complete code of this demo is in the FlowLayoutDemo.javafile.The
FlowLayoutclass puts components in a row, sized at their preferred size. If the horizontal space in the container is too small to put all the components in one row, theFlowLayoutclass uses multiple rows. If the container is wider than necessary for a row of components, the row is, by default, centered horizontally within the container. To specify that the row is to aligned either to the left or right, use aFlowLayoutconstructor that takes an alignment argument. Another constructor of theFlowLayoutclass specifies how much vertical or horizontal padding is put around the components.The code snippet below creates a
FlowLayoutobject and the components it manages.FlowLayout experimentLayout = new FlowLayout(); ... compsToExperiment.setLayout(experimentLayout); compsToExperiment.add(new JButton("Button 1")); compsToExperiment.add(new JButton("Button 2")); compsToExperiment.add(new JButton("Button 3")); compsToExperiment.add(new JButton("Long-Named Button 4")); compsToExperiment.add(new JButton("5"));Select either the Left to Right or Right to Left option and click the Apply orientation button to set up the component's orientation. The following code snippet applies the Left to Right components orientation to the
experimentLayout.compsToExperiment.setComponentOrientation( ComponentOrientation.LEFT_TO_RIGHT);

The FlowLayout API
The following table lists constructors of the
FlowLayoutclass.
Constructor Purpose FlowLayout()Constructs a new FlowLayoutobject with a centered alignment and horizontal and vertical gaps with the default size of 5 pixels.FlowLayout(int align)Creates a new flow layout manager with the indicated alignment and horizontal and vertical gaps with the default size of 5 pixels. The alignment argument can be FlowLayout.LEADING,FlowLayout.CENTER, orFlowLayout.TRAILING. When theFlowLayoutobject controls a container with a left-to right component orientation (the default), theLEADINGvalue specifies the components to be left-aligned and theTRAILINGvalue specifies the components to be right-aligned.FlowLayout (int align, int hgap, int vgap)Creates a new flow layout manager with the indicated alignment and the indicated horizontal and vertical gaps. The hgapandvgaparguments specify the number of pixels to put between components.
Examples that Use FlowLayout
The following table lists code examples that use theFlowLayoutclass and provides links to related sections.
Example Where Described Notes FlowLayoutDemoThis page Sets up a content pane to use FlowLayout. If you set theRIGHT_TO_LEFTconstant totrueand recompile, you can see howFlowLayouthandles a container that has a right-to-left component orientation.CardLayoutDemoHow to Use CardLayout Centers a component nicely in the top part of a BorderLayout, and puts the component in aJPanelthat uses aFlowLayout.ButtonDemoHow to Use Buttons, Check Boxes, and Radio Buttons Uses the default FlowLayoutof aJPanel.TextInputDemoHow to Use Formatted Text Fields Uses a panel with a right-aligned FlowLayoutpresenting two buttons.
