The HTML look and feel of the forms that Django renders seems a bit limited and plain. However, you can add code to both the Python view function and the HTML template to customize the form's look and feel. The following sections discuss changing the look and feel of the HTML forms.
One of the biggest changes you can make to alter the look and feel of a Form Field object is to change the Widget object. All Field objects have an associated Widget object that is used to generate the HTML code for the Field. Appendix B has more information on Form Fields and Widgets.
Django allows you to specify attributes for the Widget as well as specify a totally different Widget to use for the form. Changing the Widget results in changing the HTML code that is generated when the form is rendered as HTML.
For example, consider the following Form code, which renders a form similar to the one shown in Figure 10.6:
class MForm(forms.Form):
    name = forms.CharField(max_length=50)
    location = forms.CharField(max_length=80)
    size = forms.CharField(max_lenght=20))
    desc = forms.CharField(max_length=200)
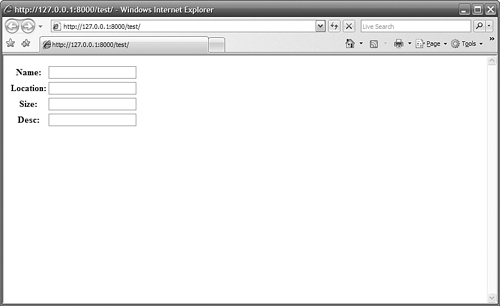
All the HTML elements are text inputs and are the same size even though the Fields are for different types of data. The following definition for the form sets the size attribute of the length field and changes the size field to a RadioSelect and the desc field to a Textarea, as shown in Figure 10.7:
sList = [('S', 'Hill'),('M','Peak'), ('L', 'Climber')]
class MForm(forms.Form):
    name = forms.CharField(max_length=50)
    location = forms.CharField(widget=
               forms.TextInput(attrs={'size':'40'}))
   size = forms.CharField(widget=
               forms.RadioSelect(choices=sList))
   desc = forms.CharField(widget=forms.Textarea(
               attrs={'rows':'4','cols':'40'}))
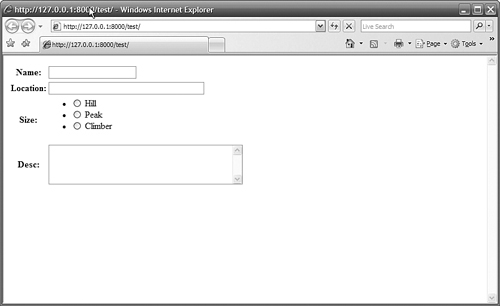
The form in Figure 10.7 would be much more useful, and it doesn't take that much extra code.
The only thing you really need to watch out for when customizing forms is to make sure that they still conform to the data that you work with.
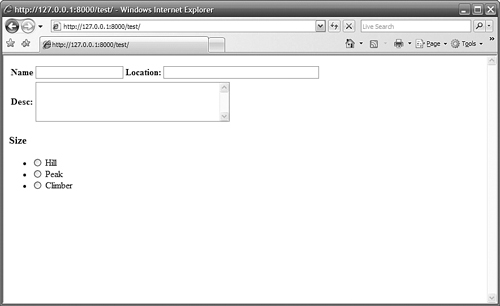
Another way to customize your forms is using HTML templates. When you pass forms into a template, you can access the fields directly using the . (dot) syntax. This allows you to access not only the value of the field, but also the field attributes, such as label_tag and help_text.
The following code snippet from an HTML template shows how you can access an instance of the MForm from the preceding section and use your own HTML code to control how it is displayed, as shown in Figure 10.8:
<table>
<tr>
    <th>{{ MForm.name.label_tag }}</th>
    <td>{{ MForm.name }}</td>
    <th>{{ MForm.location.label_tag }}:</th>
    <td>{{ MForm.location }}</td>
</tr>
<tr>
    <th>{{ MForm.desc.label_tag }}:</th>
    <td colspan="3">{{ MForm.desc }}</td>
</tr>
</table>
<h3>{{ MForm.size.label_tag }}</h3>
{{ MForm.size }}
By the Way
You can also access the Form as a list in the template and use it in a for loop. This makes it easy to apply the same HTML code to several fields. For example:
{% for field in MForm %}
<h2>{{ field.label_tag }}</h2>
{{ field }}
{% endfor %}
Try It Yourself: Create and Generate a Customized FormIn this section, you will modify the contact form created earlier in this hour to display a better-looking form. Follow these steps to modify the Form definition and HTML template files:
Figure 10.9. Modified contact form displayed as an HTML table in the contact_form.html template.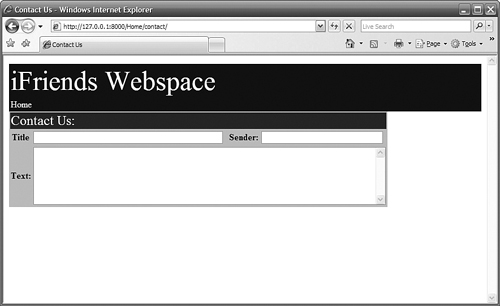
Listing 10.5. Full Contents of iFriends/Home/views.py
Listing 10.6. Full Contents of iFriends/templates/Home/contact_form.html
|