In the previous sections, you learned how to define new Form objects and render them as HTML. Django also allows you to create Form objects from a model or an instance of a model.
Creating forms from models is easy and limits coding errors. However, you do not have as much control over forms created from models as forms you create yourself.
The following sections describe the process of creating a form from a model class using the form_for_model() helper function and creating a form from a model instance using the form_for_instance() helper function.
The form_for_model() function accepts a model class and creates a Form class with a Field object that corresponds to each Field object in the model. You can then use the Form class to create Form instances that can be rendered as HTML. For a mapping of Form Fields to Model Fields, see Appendix B.
For example, let's look at creating a Form object from this Blog model:
class Blog(models.Model):
    title = models.CharField('Title', max_length=200)
    text = models.TextField('Text', max_length=2048)
    date = models.DateTimeField('Last Modified')
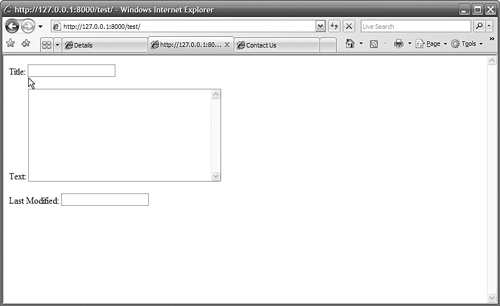
The following code snippet creates a Form class from the Blog model, creates a Form instance from the Form class, and renders it as HTML paragraphs, as shown in Figure 10.2:
from django.http import HttpResponse
from iFriends.People.models import Blog
from django import newforms as forms
. . .
BlogForm = forms.form_for_model(Blog)
bf = BlogForm()
return HttpResponse(bf.as_p())
Did you Know?
If you set the editable=False option when creating a Field in a model, that Field is not added to the Form class created by form_for_model() or form_for_instance().
You can use the form_for_instance() helper function to create a Form class from an object that is a model instance. The form_for_instance() function works basically the same way as the form_for_model() function. For each Field object in the model, a corresponding Field is created in the Form class.
The big difference is that the data values from the model instance are assigned as initial values of the form. When the Form is rendered as HTML, those values are placed as initial values in the form.
Another advantage of using the form_for_instance() function is that you don't necessarily need to know what model is being rendered. This can be helpful if you want to write generic views that will render forms from different types of objects.
For an example, let's use the Blog class defined in the preceding section. The following code snippet uses form_for_instance() to create a Form class from the Blog object instance, creates a Form instance from the Form class, and renders it as HTML paragraphs, as shown in Figure 10.3:
from django.http import HttpResponse
from django.shortcuts import get_object_or_404
from iFriends.People.models import Blog
from django import newforms as forms
. . .
blog = get_object_or_404(Blog, pk=1)
BlogForm = forms.form_for_instance(blog)
bf = BlogForm()
return HttpResponse(bf.as_p())
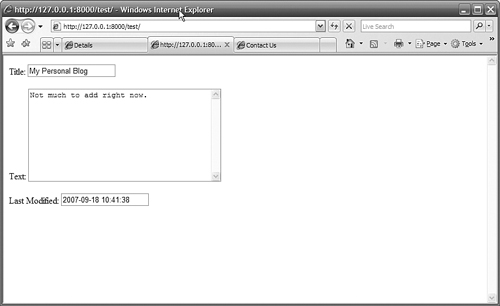
Notice that the form's values are already filled in with the values in the Blog instance.
The form_for_model() and form_for_instance() functions accept a fields argument that allows you to specify which Field objects are added to the Form class. The fields argument is set to a list of Field names that exist in the model. Only the fields that are listed in the fields argument are added to the Form class.
The fields argument gives you more flexibility when creating forms for models. For example, consider the Blog class from the previous sections. The Last Modified field isn't something that the user needs to modify. The following code snippet uses the fields argument in form_for_instance() to create a Form class that is a subset of the Blog object instance. The Form class includes only the title and text fields that are listed in the fields argument, as shown in Figure 10.4:
from django.http import HttpResponse
from django.shortcuts import get_object_or_404
from iFriends.People.models import Blog
from django import newforms as forms
. . .
blog = get_object_or_404(Blog, pk=1)
BlogForm = forms.form_for_instance(blog, fields=('title', 'text')
bf = BlogForm()
return HttpResponse(bf.as_p())
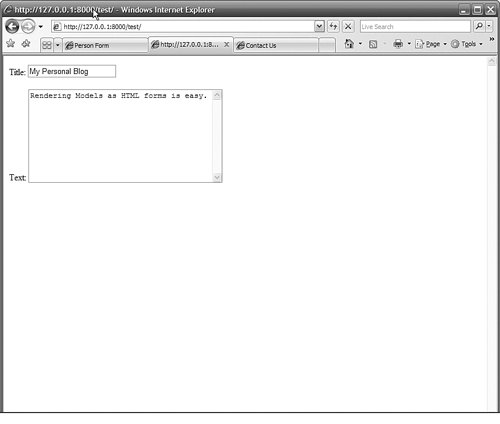
Notice that the Last Modified field is not present in the form because it is not listed in the fields argument.
Watch Out!
Fields that are omitted from the fields argument must not be required for validation. They need to be allowed to have a None value by setting Blank=True, contain a default value, or be filled in automatically.
Try It Yourself: Create and Render a Form for a ModelIn this section, you will create a person_form() view that displays a Person object as a form. Follow these steps to add the person_form() that creates a form from a Person object, create an HTML template to display the form, and update the URLconf file to enable the view:
Figure 10.5. Person form rendered as an HTML table in the person_form.html template.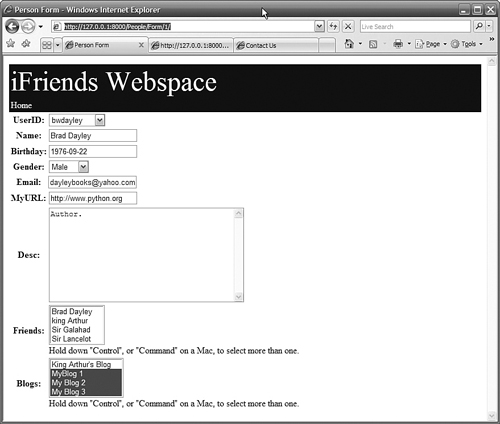
Listing 10.3. Full Contents of iFriends/People/views.py
Listing 10.4. Full Contents of iFriends/templates/People/person_form.html
|