How to Decorate Components with the JLayer Class
The JLayer class is a flexible and powerful decorator for Swing
components. It enables you to draw on components and respond to component
events without modifying the underlying component directly.
The JLayer class in Java SE 7 is similar in spirit to the
JxLayer project project at
java.net. The JLayer class was initially based on
the JXLayer project, but its API evolved separately.
This document describes examples that show the power of the JLayer class.
Full source code is available.
- Using the
JLayerClass - Using the
LayerUIClass - Drawing on Components
- Responding to Events
- Animating a Busy Indicator
- Validating Text Fields
For a brief introduction to the material on this page, watch the following video.
A JavaScript-enabled web browser and an Internet connection are required for the video. If you cannot see the video, try viewing it at YouTube.
Using the JLayer Class
The javax.swing.JLayer class is half of a team. The other half
is the javax.swing.plaf.LayerUI class.
Suppose you want to do some custom
drawing atop a JButton object (decorate the
JButton object). The component you want to decorate is the target.
- Create the target component.
- Create an instance of a
LayerUIsubclass to do the drawing. - Create a
JLayerobject that wraps the target and theLayerUIobject. - Use the
JLayerobject in your user interface just as you would use the target component.
For example, to add an instance of a JPanel subclass to a
JFrame object, you would do something similar to this:
JFrame f = new JFrame();

JPanel panel = createPanel();

f.add (panel);
To decorate the JPanel object, do something
similar to this instead:
JFrame f = new JFrame();

JPanel panel = createPanel();
LayerUI<JPanel> layerUI = new MyLayerUISubclass();
JLayer<JPanel> jlayer = new JLayer<JPanel>(panel, layerUI);

f.add (jlayer);
Use generics to ensure that the JPanel object and the LayerUI
object
are for compatible types. In the previous example, both the
JLayer object and the LayerUI object are used with
the JPanel class.
The JLayer class is usually generified with the exact type of its
view component, while the LayerUI class is designed to be used with
JLayer classes of its generic parameter or any of its ancestors.
For example, a LayerUI<JComponent> object can be used with a
JLayer<AbstractButton> object.
A LayerUI object is responsible for custom decoration and event handling
for a JLayer object. When you create an instance of a LayerUI subclass,
your custom behavior can be applicable to every JLayer object with an
appropriate generic type. That is why the JLayer class is final; all
custom behavior is encapsulated in your LayerUI subclass, so there
is no need to make a JLayer subclass.
Using the LayerUI Class
The LayerUI class inherits most of its behavior from
the ComponentUI class. Here are the most commonly overridden methods:
-
The
paint(Graphics g, JComponent c)method is called when the target component needs to be drawn. To render the component in the same way that Swing renders it, call thesuper.paint(g, c)method. -
The
installUI(JComponent c)method is called when an instance of yourLayerUIsubclass is associated with a component. Perform any necessary initializations here. The component that is passed in is the correspondingJLayerobject. Retrieve the target component with theJLayerclass'getView()method. -
The
uninstallUI(JComponent c)method is called when an instance of yourLayerUIsubclass is no longer associated with the given component. Clean up here if necessary.
Drawing on Components
To use the JLayer class, you need a good LayerUI
subclass. The simplest kinds of LayerUI classes change how components are
drawn. Here is one, for example, that paints a transparent color gradient on a
component.
class WallpaperLayerUI extends LayerUI<JComponent> {
  @Override
  public void paint(Graphics g, JComponent c) {
    super.paint(g, c);

    Graphics2D g2 = (Graphics2D) g.create();

    int w = c.getWidth();
    int h = c.getHeight();
    g2.setComposite(AlphaComposite.getInstance(
            AlphaComposite.SRC_OVER, .5f));
    g2.setPaint(new GradientPaint(0, 0, Color.yellow, 0, h, Color.red));
    g2.fillRect(0, 0, w, h);

    g2.dispose();
  }
}
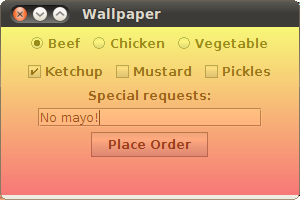
The paint() method is where the custom drawing takes place.
The call to the
super.paint() method draws the contents of the JPanel
object.
After setting up a 50% transparent composite, the color gradient is drawn.
After the LayerUI subclass is defined, using it is simple.
Here is some source code that uses the WallpaperLayerUI class:
import java.awt.*;
import javax.swing.*;
import javax.swing.plaf.LayerUI;

public class Wallpaper {
  public static void main(String[] args) {
    javax.swing.SwingUtilities.invokeLater(new Runnable() {
      public void run() {
        createUI();
      }
    });
  }

  public static void createUI() {
    JFrame f = new JFrame("Wallpaper");

    JPanel panel = createPanel();
    LayerUI<JComponent> layerUI = new WallpaperLayerUI();
    JLayer<JComponent> jlayer = new JLayer<JComponent>(panel, layerUI);

    f.add (jlayer);

    f.setSize(300, 200);
    f.setDefaultCloseOperation (JFrame.EXIT_ON_CLOSE);
    f.setLocationRelativeTo (null);
    f.setVisible (true);
  }

  private static JPanel createPanel() {
    JPanel p = new JPanel();

    ButtonGroup entreeGroup = new ButtonGroup();
    JRadioButton radioButton;
    p.add(radioButton = new JRadioButton("Beef", true));
    entreeGroup.add(radioButton);
    p.add(radioButton = new JRadioButton("Chicken"));
    entreeGroup.add(radioButton);
    p.add(radioButton = new JRadioButton("Vegetable"));
    entreeGroup.add(radioButton);

    p.add(new JCheckBox("Ketchup"));
    p.add(new JCheckBox("Mustard"));
    p.add(new JCheckBox("Pickles"));

    p.add(new JLabel("Special requests:"));
    p.add(new JTextField(20));

    JButton orderButton = new JButton("Place Order");
    p.add(orderButton);

    return p;
  }
}
Here is the result:
Source code:
Run with Java Web Start:

The LayerUI class' paint() method gives you complete control
over how a component is drawn. Here is another LayerUI
subclass that shows how the entire contents of a panel can be modified using Java 2D
image processing:
class BlurLayerUI extends LayerUI<JComponent> {
  private BufferedImage mOffscreenImage;
  private BufferedImageOp mOperation;

  public BlurLayerUI() {
    float ninth = 1.0f / 9.0f;
    float[] blurKernel = {
      ninth, ninth, ninth,
      ninth, ninth, ninth,
      ninth, ninth, ninth
    };
    mOperation = new ConvolveOp(
            new Kernel(3, 3, blurKernel),
            ConvolveOp.EDGE_NO_OP, null);
  }

  @Override
  public void paint (Graphics g, JComponent c) {
    int w = c.getWidth();
    int h = c.getHeight();

    if (w == 0 || h == 0) {
      return;
    }

    // Only create the offscreen image if the one we have
    // is the wrong size.
    if (mOffscreenImage == null ||
            mOffscreenImage.getWidth() != w ||
            mOffscreenImage.getHeight() != h) {
      mOffscreenImage = new BufferedImage(w, h, BufferedImage.TYPE_INT_RGB);
    }

    Graphics2D ig2 = mOffscreenImage.createGraphics();
    ig2.setClip(g.getClip());
    super.paint(ig2, c);
    ig2.dispose();

    Graphics2D g2 = (Graphics2D)g;
    g2.drawImage(mOffscreenImage, mOperation, 0, 0);
  }
}
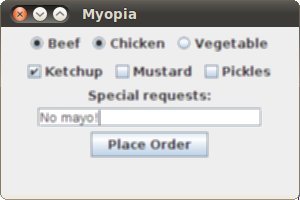
In the paint() method, the panel is rendered into an offscreen
image. The offscreen image is processed with a convolution operator, then drawn
to the screen.
The entire user interface is still live, just blurry:
Source code:
Run with Java Web Start:

Responding to Events
Your LayerUI subclass can also receive all of the events of its
corresponding component. However, the JLayer instance must register its
interest in specific types of events. This happens with the JLayer
class'
setLayerEventMask() method. Typically, however, this call is made
from initialization performed in the LayerUI class'
installUI() method.
For example, the following excerpt shows a portion of a LayerUI subclass that
registers to receive mouse and mouse motion events.
public void installUI(JComponent c) {
  super.installUI(c);
  JLayer jlayer = (JLayer)c;
  jlayer.setLayerEventMask(
    AWTEvent.MOUSE_EVENT_MASK |
    AWTEvent.MOUSE_MOTION_EVENT_MASK
  );
}
All events going to your JLayer subclass get routed to an
event handler method whose name matches the event type. For example, you can
respond to mouse and
mouse motion events by overriding corresponding methods:
protected void processMouseEvent(MouseEvent e, JLayer l) {
  // ...
}

protected void processMouseMotionEvent(MouseEvent e, JLayer l) {
  // ...
}
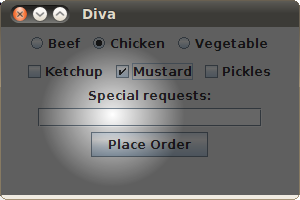
The following is a LayerUI subclass that draws a translucent circle
wherever the mouse moves inside a panel.
class SpotlightLayerUI extends LayerUI<JPanel> {
  private boolean mActive;
  private int mX, mY;

  @Override
  public void installUI(JComponent c) {
    super.installUI(c);
    JLayer jlayer = (JLayer)c;
    jlayer.setLayerEventMask(
      AWTEvent.MOUSE_EVENT_MASK |
      AWTEvent.MOUSE_MOTION_EVENT_MASK
    );
  }

  @Override
  public void uninstallUI(JComponent c) {
    JLayer jlayer = (JLayer)c;
    jlayer.setLayerEventMask(0);
    super.uninstallUI(c);
  }

  @Override
  public void paint (Graphics g, JComponent c) {
    Graphics2D g2 = (Graphics2D)g.create();

    // Paint the view.
    super.paint (g2, c);

    if (mActive) {
      // Create a radial gradient, transparent in the middle.
      java.awt.geom.Point2D center = new java.awt.geom.Point2D.Float(mX, mY);
      float radius = 72;
      float[] dist = {0.0f, 1.0f};
      Color[] colors = {new Color(0.0f, 0.0f, 0.0f, 0.0f), Color.BLACK};
      RadialGradientPaint p =
          new RadialGradientPaint(center, radius, dist, colors);
      g2.setPaint(p);
      g2.setComposite(AlphaComposite.getInstance(
          AlphaComposite.SRC_OVER, .6f));
      g2.fillRect(0, 0, c.getWidth(), c.getHeight());
    }

    g2.dispose();
  }

  @Override
  protected void processMouseEvent(MouseEvent e, JLayer l) {
    if (e.getID() == MouseEvent.MOUSE_ENTERED) mActive = true;
    if (e.getID() == MouseEvent.MOUSE_EXITED) mActive = false;
    l.repaint();
  }

  @Override
  protected void processMouseMotionEvent(MouseEvent e, JLayer l) {
    Point p = SwingUtilities.convertPoint(e.getComponent(), e.getPoint(), l);
    mX = p.x;
    mY = p.y;
    l.repaint();
  }
}
The mActive variable indicates whether or not the mouse is inside the
coordinates of the panel. In the installUI() method, the
setLayerEventMask() method is called to indicate the
LayerUI subclass' interest in receiving mouse and mouse motion
events.
In the processMouseEvent() method, the mActive flag is set
depending on the position of the mouse. In the
processMouseMotionEvent() method, the coordinates of the mouse movement
are stored in the mX and mY member variables
so that they can be used later
in the paint() method.
The paint() method shows the default appearance of the panel, then
overlays a radial gradient for a spotlight effect:
Source code:
Run with Java Web Start:

Animating a Busy Indicator
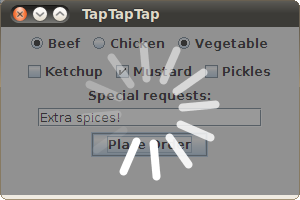
This example is an animated busy indicator. It demonstrates animation in a
LayerUI subclass and features a fade-in and fade-out. It
is more complicated that the previous examples, but it is based on the same
principle of defining a paint() method for custom drawing.
Click the Place Order button to see the busy indicator for 4 seconds. Notice how the panel is grayed out and the indicator spins. The elements of the indicator have varying levels of transparency.
The LayerUI subclass, the WaitLayerUI class, shows how to
fire property change events to update the component. The WaitLayerUI
class uses a
Timer object to update its state 24 times a second. This happens in the
timer's target method, the actionPerformed() method.
The actionPerformed() method uses the firePropertyChange()
method to
indicate that the internal state was updated. This triggers a call to
the applyPropertyChange() method, which repaints the JLayer
object:
Source code:
Run with Java Web Start:

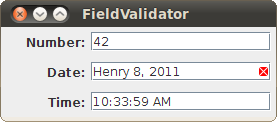
Validating Text Fields
The final example in this document shows how the JLayer class
can be used to
decorate text fields to show if they contain valid data. While the other
examples use the JLayer class to wrap panels or general
components, this example shows how to wrap a JFormattedTextField
component
specifically. It also demonstrates that a single LayerUI subclass
implementation can be used for multiple JLayer instances.
The JLayer class is used to provide a visual indication for fields that have
invalid data. When the ValidationLayerUI class paints the text field, it
draws a red X if the field contents cannot be parsed. Here is an example:
Source code:
Run with Java Web Start:

