Previous Page Next Page

Overriding Block Tags in a Custom Admin Template

So far we have discussed customizing entire template files by replacing them with either modified copies or completely new ones. You can also customize at a block level inside the template file.

You can extend the original template at the beginning of a custom template using the extend tag. Then you only need to add the custom block tags in the custom template that need to be customized.

For example, if you only wanted to override the extrahead block tag in the change_form.html template file, you could use the following contents in the customized template:

{% extends "admin/change_form.html" %}
{% block extrahead %}
    <your custom code>
{% endblock %}

You can override any block tag in the original template with your own custom code this way. It is not always convenient to override an existing block tag.

Another way you can add different code to different applications or objects using this method is to override the full template at the site level with a customized template that includes your own custom block tags. Then you can include custom templates at the application or object level that override your custom block tags with code specific to that application.

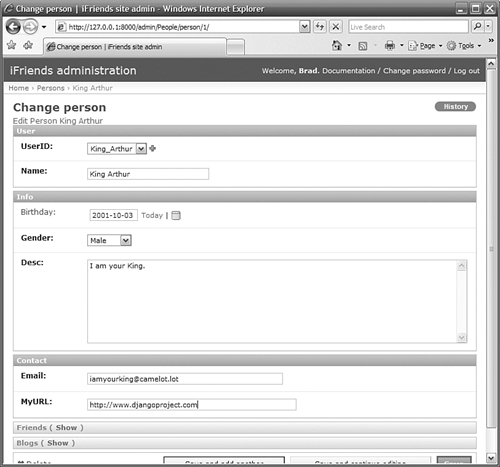
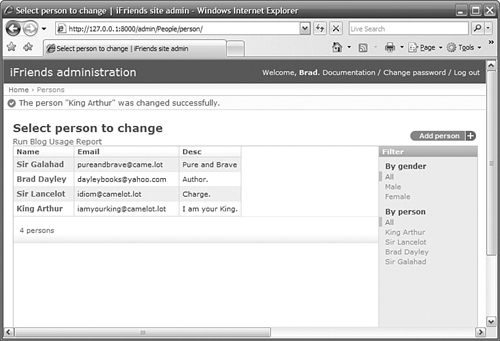
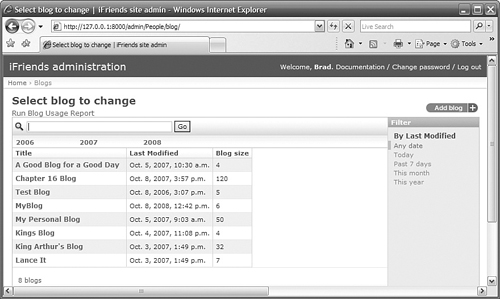
Try It Yourself: Override Admin Templates at the Application and Object Level

In this section, you will override the change_form.html template for the Person object in the People application to include a link to the person_form() view. To add the link, you will override the form_top block in the original template.

You will also override the change_list.html template at the People application level to include a link to the blog_usage() view. You need to override the change_list.html template at the site level first to add a new custom block that can be overridden at the People application level.

Use the following steps to override the change_list.html and change_form.html templates:

1.
Create the iFriends/admin/People/person directory structure.

2.
Create and open the iFriends/templates/admin/People/person/change_form.html file in an editor.

3.
Add the following line of code, shown in Listing 18.4, to extend the original change_form.html template:

{% extends "admin/change_form.html" %}

4.
Add the following block tag, shown in Listing 18.4, to override the form_top block in the original template and render a link to the person_form() view for the person being displayed:

{% block form_top %}
    <a href="/People/Form/{{ form.data.id }}">
        Edit Person {{ form.data.name }}</a>
{% endblock %}

By the Way

To get the Person.id value used in the link, you access the data dictionary in the form object in the template. The best documentation about how to access this type of data is the code itself.

5.
Save the iFriends/templates/admin/People/person/change_form.html file.

6.
Copy the following file from the Django installation to the iFriends/templates/admin directory so that you can customize it at the site level:

django/contrib/admin/templates/admin/ change_list.html

7.
Open the iFriends/templates/admin/change_list.html file in an editor.

8.
Modify the content block line to include a new custom block named blog_usage:

{% block content %}{% block blog_usage %}{% endblock %}

9.
Save the iFriends/templates/admin/change_list.html file.

10.
Create and open the iFriends/templates/admin/People/change_list.html file in an editor.

11.
Add the following line of code, shown in Listing 18.5, to extend the change_list.html template you modified in steps 7 through 10:

{% extends "admin/change_list.html" %}

12.
Add the following block tag, shown in Listing 18.5. It overrides the custom blog_usage block tag you added to the site-level custom template and renders a link to the blog_usage() view:

{% block blog_usage %}
    <a href="/admin/blog_usage">Run Blog Usage Report</a>
{% endblock %}

13.
Save the iFriends/templates/admin/People/change_list.html file.

14.
Access the change form view for a Person object, shown in Figure 18.3, in the admin interface to verify that the Edit Person link appears at the top of the change form.

Figure 18.3. The custom admin change form view for a Person object displaying the Edit Person link.


15.
Click the Edit Person link to verify that the person_form() view is displayed.

16.
Access the change list view for both the Person objects, shown in Figure 18.4, and the Blog objects, shown in Figure 18.5, in the admin interface. Verify that the Run Blog Usage Report link is displayed above the list.

Figure 18.4. The custom admin change list view for Person objects displaying the Run Blog Usage Report link.


Figure 18.5. The custom admin change list view for Blog objects displaying the Run Blog Usage Report link.


17.
Click the Run Blog Usage Report link to verify that the blog_usage() view is displayed.

By the Way

The Run Blog Usage Report link is displayed in both the Person and Blog change lists because the custom template resides at the People application level. The Edit Person link does not show up on the Blog change form views because the custom template resides at the Person object level.


Listing 18.4. Full Contents of the iFriends/templates/admin/People/person/change_form.html File

{% extends "admin/change_form.html" %}

{% block form_top %}
    <a href="/People/Form/{{ form.data.id }}">
        Edit Person {{ form.data.name }}</a>
{% endblock %}

Listing 18.5. Full Contents of the iFriends/templates/admin/People/change_list.html File

{% extends "admin/change_list.html" %}

{% block blog_usage %}
    <a href="/admin/blog_usage">Run Blog Usage Report</a>
{% endblock %}


Previous Page Next Page