Another way to customize the admin interface for your website is to create your own custom views to be displayed in the admin interface. You can create your own custom view function and template file and then specify an admin path in the URLconf file when enabling it.
Creating custom views for the admin interface involves the same steps as creating a normal view. The view function can live in any application, and the template file can reside anywhere in the template path. The only real differences are that the URL to access the view begins with admin, and the view function should make certain that the user has staff privileges before allowing him or her to access the view.
Watch Out!
The admin URL patterns match just about every URL path you might try to use. So you need to add URL patterns for your custom views before including the django.contrib.admin.urls URLconf file in your own URLconf file.
You can use the staff_member_required decorator function to verify whether the user has staff privileges before giving him or her access to the view:
from django.contrib.admin.views.decorators import staff_member_required
@staff_member_required
def custom_admin_view(request):
. . .
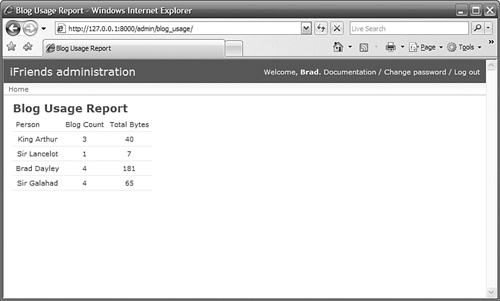
Try It Yourself: Create a Custom Admin ViewIn this section, you will create a custom admin view function and template that render usage information about each user's blogs. You will define an URL pattern so that the view can be accessed as an admin URL. You will also add the staff_member_required decorator function to ensure that only users with admin privileges can access the view. Follow these steps to create and enable the custom admin view:
Listing 18.2. Full Contents of the iFriends/templates/Custom/blog_usage.html File
Listing 18.3. Full Contents of the iFriends/Custom/views.py File
|