Previous Page Next Page

Customizing the Model Form

The preceding section covered how to customize the change list of a model in the admin interface. Django also allows you to customize how the add and update forms for the model appear in the admin interface.

You might have noticed when editing Person objects in the iFriends project that the default object forms in the admin interface can become a bit clunky as you add more fields to the model.

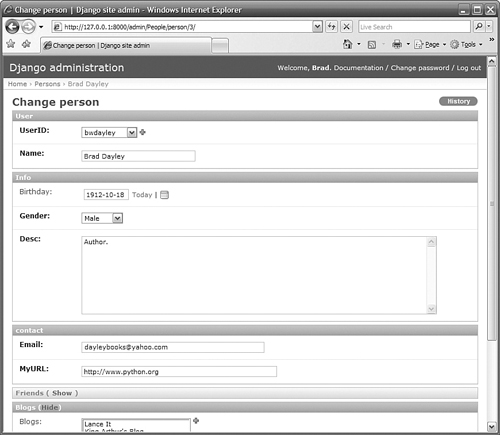
Django gives you at least some control in the model over how add and update forms will appear in the admin interface: You use the fields attribute in the Admin class. The fields attribute gets set to a list of field groups that allow you to group and display fields under a label.

To group a model's fields, add the fields attribute to the model's Admin class, and add the fields in groups using the following syntax:

fields = ((<name>, {'fields': (<field list>)}),)

The following lines of code show an example of defining the fields attribute of the Admin class:

class Admin:
    fields = (
            ('Info', {'fields':('name', 'number')}),
            ('Location', {'fields':('addr', 'city', 'state', 'zip')}),
        )

Did you Know?

The fields attribute also includes a collapse class that initially displays only the label for the group of fields with a link that expands the fields to a visible state. The following lines of code show an example of implementing the collapse class:

('Blogs', {'fields':('addr', 'city', 'state', 'zip'), 'classes':
  'collapse'}),


Try It Yourself: Configure Add and Update Forms for a Model in the Admin Interface

In this section, you will modify the look of the People model in the admin interface to make it a bit more user-friendly. You will add the fields attribute to the Admin class of the People model and define labels for different groups of fields. You will also set the blogs and friends fields to initially be collapsed.

Follow these steps to make the changes:

1.
Open the iFriends/Person/models.py file in an editor.

2.
Add the following fields attribute, shown in Listing 17.3, to the Admin class of the People model:

         fields = (
. . .
             )

3.
Add the following lines of code to the fields attribute, shown in Listing 17.3, to create User, Info, and Contact groups that include pertinent fields:

('User', {'fields':('userID', 'name')}),
('Info', {'fields':('birthday', 'gender', 'desc')}),
('Contact', {'fields':('email', 'favoriteURL')}),

4.
Add the following lines of code to the fields attribute, shown in Listing 17.3, to create Friends and Blogs groups that implement the collapse class so that they are not initially displayed:

('Friends', {'fields':('friends',), 'classes': 'collapse'}),
('Blogs', {'fields':('blogs',), 'classes': 'collapse'}),

5.
Save the iFriends/Person/models.py file.

6.
View the update page for a Person object, shown in Figure 17.7, to view the Person object with the new groups. Try expanding and collapsing the Friends and Blogs groups using the Show and Hide links.


Figure 17.7. The Person update view in the admin interface organized using the fields attribute.


Listing 17.3. The Person Model Definition in the iFriends/People/models.py File

class Person(models.Model):
    userID = models.ForeignKey(User, unique=True)
    name = models.CharField('name', max_length=200)
    birthday = models.DateField('Birthday', blank=True, null=True)
    gender = models.CharField(max_length=1, choices=gender_list)
    email = models.EmailField('Email', max_length=100, unique=True)
    favoriteURL = models.URLField('myURL', verify_exists=False)
    desc = models.TextField('Desc', max_length=500, null=True)
    friends = models.ManyToManyField('self', blank=True)
    blogs = models.ManyToManyField(Blog, blank=True)

    def __str__(self):
        return '%s' % (self.name)

    class Admin:
        fields = (
                ('User', {'fields':('userID', 'name')}),
                ('Info', {'fields':('birthday', 'gender', 'desc')}),
                ('Contact', {'fields':('email', 'favoriteURL')}),
                ('Friends', {'fields':('friends',), 'classes': 'collapse'}),
                ('Blogs', {'fields':('blogs',), 'classes': 'collapse'}),
            )

        list_display = ('name', 'email', 'desc')
        list_filter = ('gender', 'friends',)
        ordering    = ('-name',)


Previous Page Next Page