What You'll Learn in This Hour |
|
Until now we have neglected one of the shining features of Django, the admin interface. So far you have used the admin interface to create only users, permissions, and some objects. The admin interface is pretty intuitive right out of the box. However, you can customize it to make it better suit your needs.
In this hour, we will discuss customizing models in the admin interface. When you defined some models in Hour 3, "Adding Models and Objects to Your Website," you added a blank Admin class to enable the model in the admin interface. Django provides several attributes to the Admin class that help you customize module change list and form views. Also, you can modify Field definitions in models to edit two models in the same admin view.
As you begin to add numerous objects to your models, it will get more difficult to manage them using the admin interface. The admin interface has some great features to help organize the change list view for your models.
Django provides several attributes to the Admin class that enable you to modify object fields, add filters, select ordering, and add searching to the change list views in the admin interface. Because these features will be added to the Admin class, each model can be customized to best fit its own data.
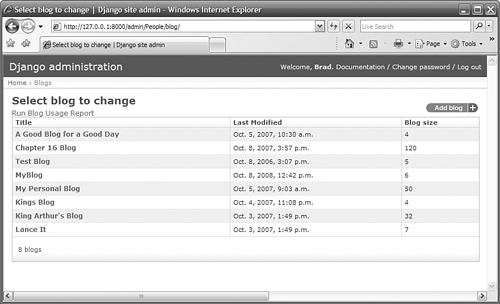
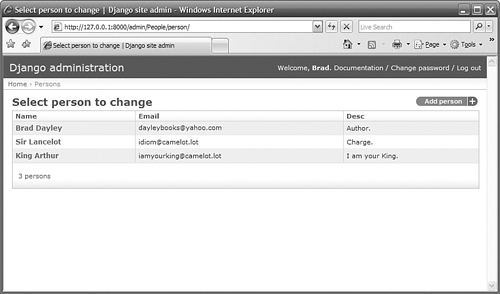
The first customization that you will likely want to do is to define which fields you want to appear in the change list view. Currently Django displays only whatever the output of the __str__() function of the model returns. However, you can set the list_display attribute of the Admin class to define a list of Fields to display in the change list view. For example:
class Admin:
    list_display = ('name', 'email',)
Did you Know?
You can also add to the display list a function that is a member of the model. The output of the function is displayed in the change list view.
Try It Yourself: Configure the List Display for a Model in the Admin InterfaceIn this section, you will add the list_display attribute to the Blog and Person models to include specific Field objects in the list display. You will also add a new blog_size() function to the Blog model that returns the size of the text field in the Blog so that you can add that to the change list view of the Blog model. Follow these steps to make the change:
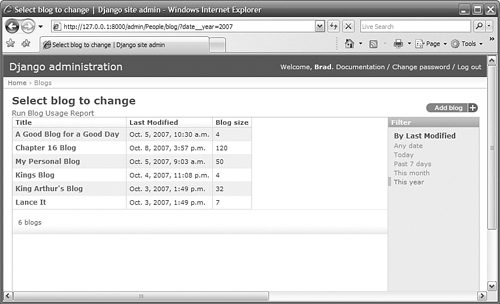
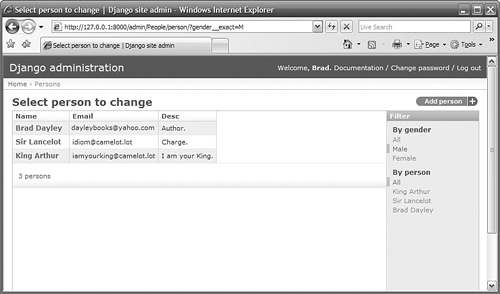
By the Way Listings 17.1 and 17.2 are used in the first four "Try It Yourself" sections in this hour. To reduce redundancy and make this hour more readable, they are placed at the end of the fourth "Try It Yourself" section. Adding FiltersDjango also allows you to add filters to limit the objects that are displayed in the change list view. Filters appear on the right side of the screen with a header and a list of links that implement a specific filter. The filter's behavior depends on the Field type you are using to filter. For example, if you add a choice Field, the available choices show up as filters. If you add a datetime Field, a list of links including Any date, Today, Past 7 days, This month, and This year are displayed. You add filters to the model by setting the list_filter attribute in the Admin class. The list_filter attribute should be set to a list of Field objects to use as filters for the model. For example: class Admin:
list_filter = ('zipcode', 'date',)
|
Try It Yourself: Configure the List Filters for a Model in the Admin InterfaceIn this section, you will add the list_filter attribute to the Blog and Person models. You will add the date field to the list_filter attribute in the Blog model to show how date fields appear in the filter list. You will add the friends and gender fields to the list_filter attribute in the Person model to show how choice and many-to-many fields show up as filters. Follow these steps to make the change:
By the Way Listings 17.1 and 17.2 are used in the first four "Try It Yourself" sections in this hour. To reduce redundancy and make the hour more readable, they are placed at the end of the fourth "Try It Yourself" section. |
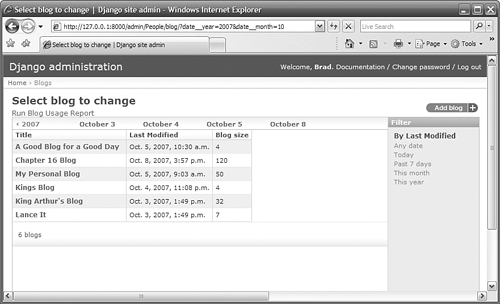
Using a datetime field in the list_filter attribute is a useful way to filter objects by date. However, there is a much more useful method if the list has many objects. The admin interface provides a date hierarchy application that builds a hierarchy of objects based on a datetime field.
The hierarchy appears at the top of the change list and initially includes the years that are represented in the objects of the change list. You can click a year and see a list of month links and then click a month link to see a list of day links.
To add a date hierarchy to the change list view, add the date_hierarchy attribute to the Admin class in the model. The date_hierarchy attribute should be set to the name of a single datetime field in the model. For example:
date_hierarchy = 'login_date'
Try It Yourself: Configure Date Hierarchy Navigation for a Model in the Admin InterfaceIn this section, you will add date hierarchy navigation to the change list of the Blog model. Follow these steps to add the date field to the date_hierarchy attribute of the Admin class in the Blog model to implement a date hierarchy:
By the Way Listings 17.1 and 17.2 are used in the first four "Try It Yourself" sections in this hour. To reduce redundancy and make the hour more readable, they are placed at the end of the fourth "Try It Yourself" section. |
As you may have discovered, if you click the headers in the change list, the list is ordered based on the values in that column. If you click the header again, it reverses the ordering of the list.
Django also allows you to set the initial ordering using the ordering attribute of the Admin class. To configure the ordering, set the ordering attribute to a list of fields in the model. The list is ordered by the fields in the order in which they appear in the list. For example:
class Admin:
    ordering = ('lastname', 'firstname',)
Did you Know?
If you put a minus sign in front of the field name, the list is sorted in reverse order for that field.
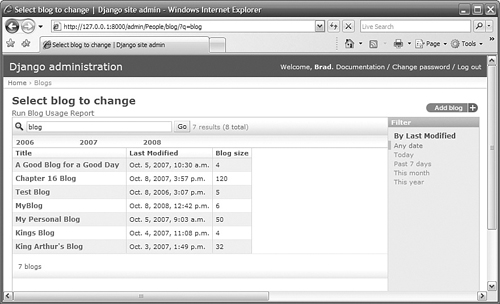
Another useful feature of the admin interface is the ability to search specific Fields in the model and then limit the change list to objects that are found in the search. This feature becomes useful as the number of objects in a model increases.
To implement a search in the change list, add the search_fields attribute to the Admin class. The search_fields attribute should be set to a list of Fields in the object that you want the admin interface to search when building the change list. For example:
class Admin:
    search_fields = ('title', 'text',)
By the Way
Because the search searches through the objects in the order in which they appear in the list, you should order the list so that entries can be found as quickly as possible.
Try It Yourself: Configure a List Search for a Model in the Admin InterfaceIn this section, you will add search capability to the change list of the Blog model. Follow these steps to add the title and text fields to the search_fields attribute of the Admin class in the Blog model to enable searching:
Listing 17.1. The Blog Model Definition in the iFriends/People/models.py File
Listing 17.2. The Person Model Definition in the iFriends/People/models.py File
|