1. | Open the iFriends/Person/views.py file in an editor.
|
2. | Create a new view function called add_blog(), as shown in Listing 11.5. |
3. | Add the following lines of code, shown in Listing 11.5, to initialize a BlogForm instance and message and to get the Person object that the new Blog will be added to:
BlogForm = forms.form_for_model(Blog, fields=('title', 'text'))
bf = BlogForm()
message = 'Unknown Request'
p = get_object_or_404(Person, pk=pID)
|
4. | Add the following lines of code, shown in Listing 11.5, to add a simple GET handler:
if request.method == 'GET':
    message = 'Add Blog for %s ' % p.name
|
| |
5. | Add the following lines of code, shown in Listing 11.5, to begin adding the POST handler to the view:
if request.method == 'POST':
    if request.POST['submit'] == 'Add':
|
6. | Add the following line of code to the POST handler, shown in Listing 11.5, to create an instance of the BlogForm with only the title and text Fields from the POST data that will be rendered in the template:
bf = BlogForm(request.POST.copy())
|
7. | Add the following lines of code to the POST handler, shown in Listing 11.5, to create a Form class for the full Blog. Add the title and text Fields from the POST data and a date Field set to the current time to a dictionary. Use that dictionary to create an instance of the SaveForm for the Blog object:
SaveForm = forms.form_for_model(Blog)
postDict = request.POST.copy()
postDict['date'] = datetime.now()
save_bf = SaveForm(postDict)
|
8. | Add the following line of code to the POST handler to validate the instance of the Blog SaveForm and either save the object or set the error message:
if save_bf.is_valid():
    try:
        bObj = save_bf.save()
. . .
        message = 'Blog added to %s.' % p.name
    except:
        message = 'Database Error.'
else:
    message = 'Invalid data in Form.'
|
9. | Add the following lines of code to the try block in the POST handler, shown in Listing 11.5, to add the new Blog object to the Person object, and save the Person object:
p.blogs.add(bObj)
p.save()
|
10. | Add the following lines of code to the end of the add_blog() function, shown in Listing 11.5, to render the data to an add_blog_form.html template file.
return render_to_response(
    'People/add_blog_form.html',
    {'bForm':bf, 'message': message})
|
11. | Save the iFriends/Person/views.py file.
|
12. | Create and open a file called iFriends/templates/Person/add_blog_form.html in an editor.
|
| |
13. | Add the code shown in Listing 11.6 to the file to render a Blog Form object, bForm, as a table, and add an Add button to submit the form. |
14. | Save the iFriends/templates/Person/add_blog_form.html file.
|
15. | Open the iFriends/templates/Person/person_details.html file in an editor.
|
16. | Add the following lines of code to the <h3> header "Blog Entries," shown in Listing 11.7, to add a link to the add_blog() view function:
<a href="
 {% url iFriends.People.views.add_blog pID=p.id %}
 ">[+]</a>
|
17. | Open the iFriends/People/urls.py file in an editor.
|
18. | Add the following line to the URL patterns to enable the add_blog() view function:
(r'^AddBlogForm/(?P<pID>\d+)/$', 'add_blog'),
|
19. | Save the iFriends/People/urls.py file.
|
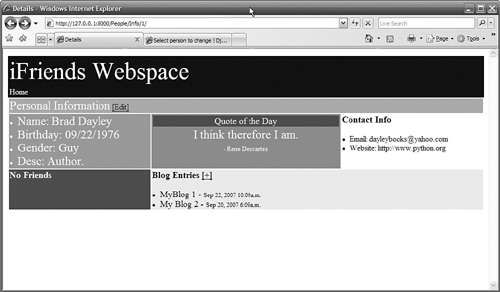
20. | Access the following URL in a web browser to bring up the Person details() view, shown in Figure 11.6, and verify that the new link has been added to the Blog object:
http://127.0.0.1:8000/Person/Info/1/
|
| |
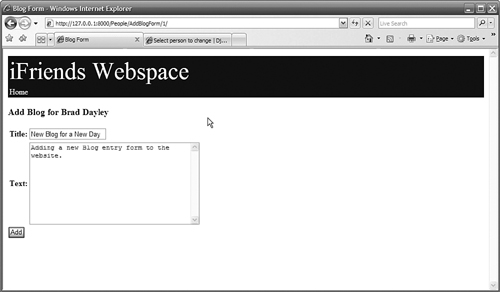
21. | Click the + link to bring up the blog_add() view, shown in Figure 11.7.
|
22. | Add data to the form, and click the Add button. The message should indicate that the new blog entry was added. |
| |
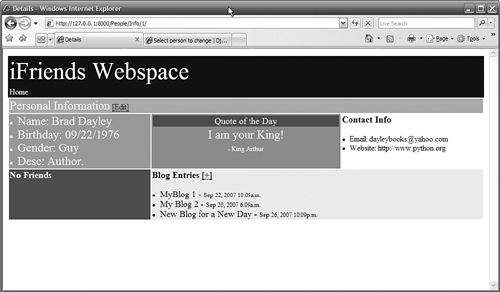
23. | Access the following URL again in a web browser to bring up the Person details() view, shown in Figure 11.8. This time the new entry you created in step 22 should show up in the blog list.
http://127.0.0.1:8000/Person/Info/1/
|