Previous Page Next Page

Hour 11. Using Views to Add and Update Data in the Database

What You'll Learn in This Hour

  • How to detect and handle GET and POST requests

  • How to validate data from POST requests against the model

  • How to update data in the database using forms

  • How to add new objects to the database using forms

In Hour 10, "Adding Forms to Views," you learned how to create Form objects and render them as HTML. In this hour, we will extend that concept and show you how to use rendered forms to update the database.

The following sections take you through the process of displaying the Form during a GET request, retrieving the updated data from the form in a POST request, validating the data, and updating the database.

Handling GET and POST Requests

The first step in using Django Forms to update the database is to handle the GET and POST requests properly. Because the GET request is the initial request to just view the page, the request has no form data. When the user clicks the submit button on the form, Django receives a POST request that contains the form data and that can be processed.

The type of request can be determined by accessing the HttpRequest object that is sent to the view function. For a GET request, the value of the request is 'GET'. For a POST request, the value is 'POST'.

For example, the following code snippet checks to see if the HttpRequest is a GET or POST request:

def my_view(request):
    if request.method == 'GET':
        #handle GET
    if request.method == 'POST':
        #handle POST

Try It Yourself: Handle GET and POST Requests in a View

In this section, you will add an update button to the person_from.html template and update the person_form() view to detect whether the request is a GET or POST. Follow these steps to add GET and POST request handling to the person_form() view:

1.
Open the iFriends/templates/People/person_form.html file in an editor.

2.
Add the following line of code, shown in Listing 11.1, to display a message at the top of the form page. The message variable is used to relay information about form processing to the web browser:

<h3>{{ message }}</h3>

3.
Add the following <form> and <input> tags around the table that renders the pForm form, shown in Listing 11.1, to add a POST method and a submit button to the form:

<form method="post" action=".">
. . .
<input type="submit" name="submit" value="update" />
</form>

4.
Save the iFriends/templates/People/person_form.html file.

5.
Open the iFriends/People/views.py file in an editor.

6.
Remove the current contents of the person_form() view function.

7.
Add the following lines of code to the person_form() view, shown in Listing 11.2, to set initial values for the Form, message, and Person objects:

PersonForm = forms.form_for_model(Person)
f = PersonForm()
message = 'Unknown Request'
p = get_object_or_404(Person, pk=pID)

8.
Add the following lines of code to the person_form() view, shown in Listing 11.2, to determine if the request is a GET request. If it is, create a Form instance, and set the message to an editing message:

if request.method == 'GET':
    PersonForm = forms.form_for_instance(p)
    f = PersonForm()
    message = 'Editing person %s ' % p.name

9.
Add the following lines of code to the person_form() view, shown in Listing 11.2, to determine if the request is a POST request. If it is, set the message to an update request message (the code to actually update the data will be added later in this hour):

if request.method == 'POST':
    if request.POST['submit'] == 'update':
        message = 'Update Request for %s.' % p.name

10.
Add the following lines of code to the person_form() view, shown in Listing 11.2, to render the response to the person_form.html template, and pass in the Form and message objects:

return render_to_response(
    'People/person_form.html',
     {'pForm':f,
      'message': message})

11.
Save the iFriends/People/views.py file.

12.
Access the following URL in a web browser to bring up the Person form view, shown in Figure 11.1, and verify that the form renders correctly with the update button and message:

http://127.0.0.1:8000/Person/Form/1/

Figure 11.1. Person form view rendered with an update button in the person_form.html template.


13.
Click the update button. The form should be displayed with the update request message and blank data, shown in Figure 11.2.

Figure 11.2. Person form view generated by clicking the update button.


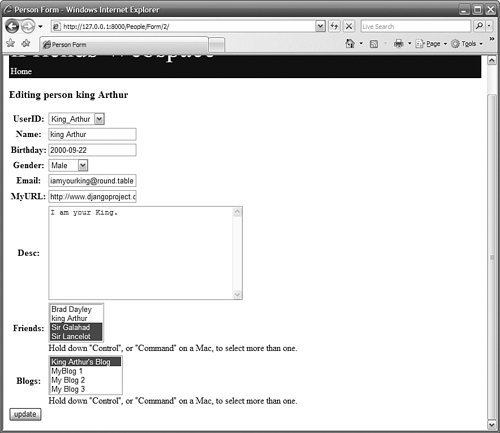
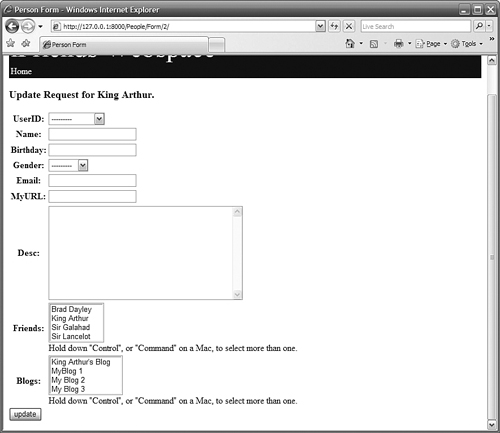
By the Way

Notice that the form's data is blank after the POST request is submitted. This is because in the POST handler, we did not get the instance of the Person object and apply it to the form.


Listing 11.1. Full Contents of iFriends/templates/People/person_form.html

{% extends "iFriends_base.html" %}
{% block title %}Person Form{% endblock %}
{% block content %}
<h3>{{ message }}</h3>

<form method="post" action=".">
<table>
{{ pForm }}
</table>
<input type="submit" name="submit" value="update" />
</form>
{% endblock %}

Listing 11.2. Full Contents of the person_form() view in iFriends/People/views.py

def person_form(request, pID='0'):
    #default
    PersonForm = forms.form_for_model(Person)
    f = PersonForm()
    message = 'Unknown Request'
    p = get_object_or_404(Person, pk=pID)

    if request.method == 'GET':
        PersonForm = forms.form_for_instance(p)
        f = PersonForm()
        message = 'Editing person %s ' % p.name

    if request.method == 'POST':
        if request.POST['submit'] == 'update':
            message = 'Update Request for %s.' % p.name

    return render_to_response(
        'People/person_form.html',
         {'pForm':f,
          'message': message})


Previous Page Next Page