How to Use BorderLayout
Note: This lesson covers writing layout code by hand, which can be challenging. If you are not interested in learning all the details of layout management, you might prefer to use the
GroupLayout layout manager combined with a builder tool to lay out your GUI. One such builder tool is the
NetBeans IDE. Otherwise, if you want to code by hand and do not want to use GroupLayout, then GridBagLayout is recommended as the next most flexible and powerful layout manager.
BorderLayout class.
Click the Launch button to run BorderLayoutDemo using Java™ Web Start (download JDK 6). Alternatively, to compile and run the example yourself, consult the example index.
BorderLayoutDemo.java file.
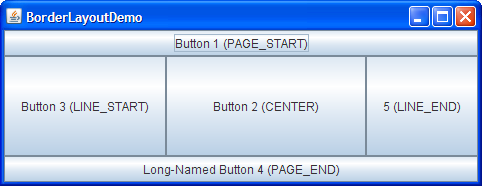
As the preceding picture shows,
a BorderLayout object has five areas.
These areas are specified by the BorderLayout constants:
PAGE_STARTPAGE_ENDLINE_STARTLINE_ENDCENTER
Version note: Before JDK release 1.4, the preferred names for the various areas were different, ranging from points of the compass (for example,
BorderLayout.NORTH
for the top area)
to wordier versions of the constants we use in our examples.
The constants our examples use are preferred
because they are standard and enable programs to adjust
to languages that have different orientations.
If the window is enlarged,
the center area
gets as much of the available space as possible.
The other areas expand only as much as necessary
to fill all available space.
Often a container uses only one or two of the
areas of the BorderLayout object —
just the center,
or the center and the bottom.
The following code adds components to a frame's content pane.
Because content panes use the BorderLayout class by default,
the code does not need to set the layout manager.
The complete program is in the
BorderLayoutDemo.java file.
...//Container pane = aFrame.getContentPane()...
JButton button = new JButton("Button 1 (PAGE_START)");
pane.add(button, BorderLayout.PAGE_START);

//Make the center component big, since that's the
//typical usage of BorderLayout.
button = new JButton("Button 2 (CENTER)");
button.setPreferredSize(new Dimension(200, 100));
pane.add(button, BorderLayout.CENTER);

button = new JButton("Button 3 (LINE_START)");
pane.add(button, BorderLayout.LINE_START);

button = new JButton("Long-Named Button 4 (PAGE_END)");
pane.add(button, BorderLayout.PAGE_END);

button = new JButton("5 (LINE_END)");
pane.add(button, BorderLayout.LINE_END);
Specify the component's location
(for example, BorderLayout.LINE_END)
as one of the arguments to the add method.
If this component is missing
from a container controlled by a BorderLayout object,
make sure that the component's location was specified
and no another component was placed in the same location.
All tutorial examples that use the BorderLayout class
specify the component as the first argument to the
add method.
For example:
add(component, BorderLayout.CENTER) //preferred
add(BorderLayout.CENTER, component)  //valid but old fashioned
    or
add("Center", component)             //valid but error prone
The BorderLayout API
The following table lists constructors and methods to specify gaps (in pixels).| Constructor or Method | Purpose |
|---|---|
BorderLayout(int horizontalGap, int verticalGap) |
Defines a border layout with specified gaps between components. |
setHgap(int) |
Sets the horizontal gap between components. |
setVgap(int) |
Sets the vertical gap between components. |
Examples that Use BorderLayout
The following table lists code examples that use theBorderLayout class and
provides links to related sections.
| Example | Where Described | Notes |
|---|---|---|
BorderLayoutDemo
|
This page | Puts a component in each of the five possible locations. |
TabbedPaneDemo
|
How to Use Tabbed Panes | One of many examples that puts a single component in the center of a content pane, so that the component is as large as possible. |
CheckBoxDemo
|
How to Use Check Boxes | Creates a JPanel object that uses the BorderLayout class.
Puts components into the left (actually, LINE_START)
and center locations.
|
