Feedback Form
|
|
Start of Tutorial > Start of Trail > Start of Lesson |
Search
Feedback Form |
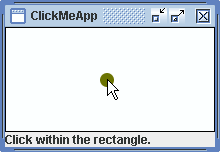
Now that you have a conceptual understanding of object-oriented programming let's look at how these concepts get translated into code. The following figure shows a snapshot of the graphical user interface (GUI) presented by an example namedClickMeApp, which features a custom GUI component namedClickMe. A spot appears when you click the mouse inside theClickMecomponent's area.
The GUI of the
ClickMeAppapplication.The
ClickMeAppexample is not large, but if you don't have much experience with programming, you might find the code daunting. We don't expect you to understand everything in this example right away, and this section won't explain every detail. The intent is to expose you to some source code and to associate it with the concepts and terminology you've just learned. You will find more details in later chapters.
There are three source files for theClickMeAppexample:ClickMeApp.java,
ClickMe.javaSpot.javaClickMeApp,ClickMe, andSpot. In addition to these classes, the example uses some classes provided by the Java platform.You can compile the
ClickMeApp.java,ClickMe.java, andSpot.javafiles by invoking the Java compiler (javac) onClickMeApp.java.You can run the
ClickMeAppexample as an application using either Java Web Start or thejavacommand. To run a precompiled version with Java Web Start, direct your browser to this URL:http://java.sun.com/docs/books/tutorialJWS/java/concepts/ex5/ClickMeApp.jnlpIf you prefer to run your own copy, you can use the command
java ClickMeApp.If you're having problems compiling or running this example, see Common Problems (and Their Solutions)
Note:ClickMeAppdepends on API introduced in J2SE 5.0. It will not run or compile under earlier versions of the JDK and runtime..
Many objects play a part in theClickMeAppexample. The most obvious ones are those with an onscreen representation: the window containing the GUI, the label describing what the user should do, the custom component that paints the initially empty rectangle, and the spot that's eventually painted by that custom component.These objects are created when the user launches the application. The application's
mainmethod creates an object to represent the entire application, and that object creates others to represent the window, label, and custom component.The object representing the custom component in turn creates an object to represent the spot on the screen. Every time you click the mouse in the custom component, the component moves the spot by changing the spot object's x,y location and repainting itself. The spot object does not display itself; the custom component paints a circle based on information contained within the spot object.
Other, nonvisible objects also play a part in the application. Three objects represent the three colors used in the custom component (black, white, and olive green), an event object represents the user action of clicking the mouse, and so on.
As you may have guessed, the object that represents the application is an instance of theClickMeAppclass, the object that represents the custom component is an instance ofClickMe, and the spot is represented by an instance ofSpot.Because the object that represents the spot on the screen is very simple, let's look at its code. The
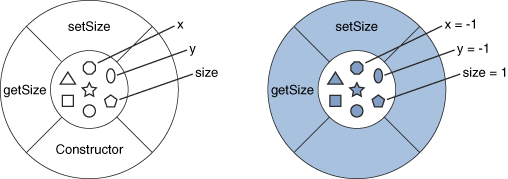
Spotclass declares three instance variables:sizecontains the spot's radius,xcontains the spot's current horizontal location, andycontains the spot's current vertical location. It also declares two methods and a constructor — a subroutine used to initialize new objects created from the class.You can recognize a constructor because it has the same name as the class. Thepublic class Spot { //instance variables public int x, y; private int size; //constructor public Spot() { x = -1; y = -1; size = 1; } //methods for access to the size instance variable public void setSize(int newSize) { if (newSize >= 0) { size = newSize; } } public int getSize() { return size; } }Spotconstructor initializes all three of the object's variables. Thexandyvariables are set to-1, indicating that the spot is not onscreen when the application starts up. Thesizevariable is set to a reasonable value, in this case1.The
setSizeandgetSizemethods provide a way for other objects to read and change the value of the size instance variable without giving other objects access to the actual variable.The application's
ClickMeobject uses aSpotobject to track whether to paint a spot, and where. Here's theClickMeclass code that declares and creates theSpotobject.The first line shown declares a variable named spot with a data type ofprivate Spot spot = null; ... spot = new Spot();Spot; it initializes the variable's value tonull. The keywordnullis used to specify an undefined value for variables that refer to objects. The next line shown creates the object (see the next figure). Thenewkeyword allocates memory space for the object.Spot()calls the constructor you saw previously.
On the left is a representation of the
Spotclass. On the right is aSpotobject just after its creation.
As you know, object A can use a message to request that object B do something, and a message has three components:Here are two lines of code from the
- The object to which the message is addressed
- The name of the method to perform
- Any parameters the method needs
ClickMeclass.Both are messages from theg2d.setColor(Color.WHITE); g2d.fillRect(0, 0, getWidth() - 1, getHeight() - 1);ClickMeobject to an object namedg2d— aGraphics2Dobject that is essential for painting onscreen. This object is provided to the component when the painting system instructs the component to paint itself. The first line sets the color to white and the second fills a rectangle the size of the component, thus painting the extent of the component's area white.The following figure highlights each part of the first message to
g2d.
The components of a message sent by the
ClickMeobject.
To paint itself onscreen, an object must be a component. This means that the object must be an instance of a class that derives from theComponentclass provided by the Java platform.The
ClickMeobject is an instance of theClickMeclass, which is declared this way:Thepublic class ClickMe extends JComponent implements MouseListener { ... }extends JComponentclause makesClickMea subclass ofJComponent— a class that derives from theComponentclass.ClickMeinherits a lot of functionality fromComponentandJComponent, including the ability to paint itself, to have a standard border around its edges, and to register listeners to be notified of mouse events. Along with these benefits, theClickMeclass has certain obligations: Its painting code must be in a standard place, such as thepaintComponentmethod; it must specify its preferred and minimum sizes; and so on.public ClickMe() { ... setPreferredSize(aDimensionObject); setMinimumSize(anotherDimensionObject); ... } public void paintComponent(Graphics g) { ... //ClickMe's painting code is here. }
TheClickMecomponent responds to mouse clicks by displaying a spot at the click location. Any object can detect mouse clicks on a component. It just needs to implement theMouseListenerinterface and register with the component as a mouse listener.The
MouseListenerinterface declares five methods, each of which is called for a different kind of mouse event: when the mouse is clicked, when the mouse moves outside of the component, and so on. Even though theClickMecomponent responds only to mouse clicks, its mouse listener implementation must have all five methods. The methods for the events that the object isn't interested in are empty.The complete code for the
ClickMecomponent follows. The code that participates in mouse event handling is in colored boldface.import javax.swing.BorderFactory; import javax.swing.JComponent; import java.awt.*; import java.awt.event.*; public class ClickMe extends JComponent implements MouseListener { private Spot spot = null; private static final int RADIUS = 7; private Color spotColor = new Color(107, 116, 2); //olive /** Creates and initializes the ClickMe component. */ public ClickMe() { addMouseListener(this); //Hint at good sizes for this component. setPreferredSize(new Dimension(RADIUS*30, RADIUS*15)); setMinimumSize(new Dimension(RADIUS*4, RADIUS*4)); //Request a black line around this component. setBorder( BorderFactory.createLineBorder(Color.BLACK)); } /** * Paints the ClickMe component. This method is * invoked by the Swing component-painting system. */ public void paintComponent(Graphics g) { /** * Copy the graphics context so we can change it. * Cast it to Graphics2D so we can use antialiasing. */ Graphics2D g2d = (Graphics2D)g.create(); //Turn on antialiasing so that painting is smooth. g2d.setRenderingHint( RenderingHints.KEY_ANTIALIASING, RenderingHints.VALUE_ANTIALIAS_ON); //Paint the background. g2d.setColor(Color.WHITE); g2d.fillRect(0, 0, getWidth() - 1, getHeight() - 1); //Paint the spot. if (spot != null) { int radius = spot.getSize(); g2d.setColor(spotColor); g2d.fillOval(spot.x - radius, spot.y - radius, radius * 2, radius * 2); } } //Methods required by the MouseListener interface. public void mousePressed(MouseEvent event) { if (spot == null) { spot = new Spot(); spot.setSize(RADIUS); } spot.x = event.getX(); spot.y = event.getY(); repaint(); } public void mouseClicked(MouseEvent event) {} public void mouseReleased(MouseEvent event) {} public void mouseEntered(MouseEvent event) {} public void mouseExited(MouseEvent event) {} }
To learn more about howClickMeworks, you need to learn about its superclasses —JComponentandComponent. How do you find that information? The API documentation, which constitutes the specification for the classes that make up the Java platform, contains detailed descriptions of every class.The API documentation for the Java 2 Platform is online at
java.sun.com. It's helpful to have the API documentation for all releases you use bookmarked in your browser. You can find the 5.0 API documentation here:http://java.sun.com/j2se/5.0/docs/api/To learn more about all the classes and interfaces from the Java platform used by the
ClickMeclass, you can look at the API documentation for the following classes.A complete discussion of using these classes them to create GUIs is in Creating a GUI with JFC/Swing
javax.swing.JComponentjava.awt.Graphicsjava.awt.Graphics2Djava.awt.Dimension
java.awt.Colorjavax.swing.BorderFactoryjava.awt.event.MouseListenerjava.awt.event.MouseEvent
The discussion in this chapter glossed over many details and left some things unexplained, but now you should have some understanding of what object-oriented concepts look like in code. Specifically, you should have a general understanding of the following:
- That a class is a blueprint for objects
- That objects are created from classes
- How to create an object from a class
- What constructors are
- How to initialize objects
- What the code for a class looks like
- What class variables and methods are
- What instance variables and methods are
- How to find out what a class's superclass is
- That an interface is a protocol of behavior
- What it means to implement an interface
|
|
Start of Tutorial > Start of Trail > Start of Lesson |
Search
Feedback Form |
Copyright 1995-2005 Sun Microsystems, Inc. All rights reserved.